


|
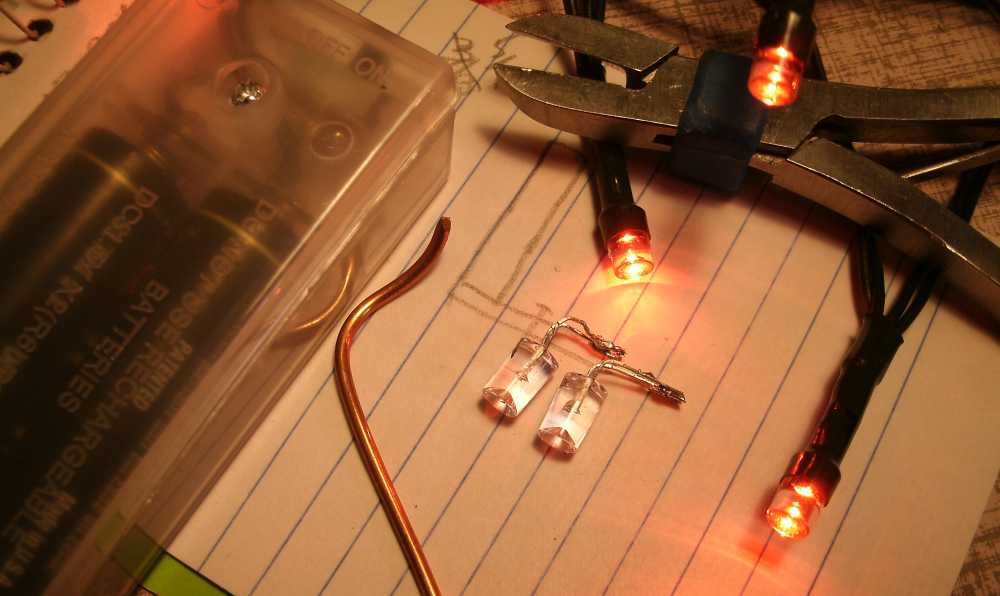
Tis the season for a bargain, and I saw that Dollar Tree (where everything is $1.00) was selling a battery powered string of colored LED lights. There's other stores that sell them, some for $2 and some for a lot more.
Each pack has a definite color LED; the epoxy might look clear but when the LED is powered up, it produced the color of light as advertised on the package, such as red, blue, yellow, warm white. But I couldn't find a green in the store, so I use the yellow for my railroad 'proceed' signal. I haven't painted any to see if I can change the yellow into green.
When Radio Shack was around, I used to pay $4 for a pack of just 2 of these components. Now, I got a whole bunch of parts for a buck. But we checked some other Dollar stores and they were sold out of some colors. The LED's come in a light string with green wire and a protective green shrink wrap over the leads. I cut away everything and got it down to the LED itself, that's the clear blobs in the middle of the picture. In HO scale, the lens is a foot and a quarter wide.
|
|
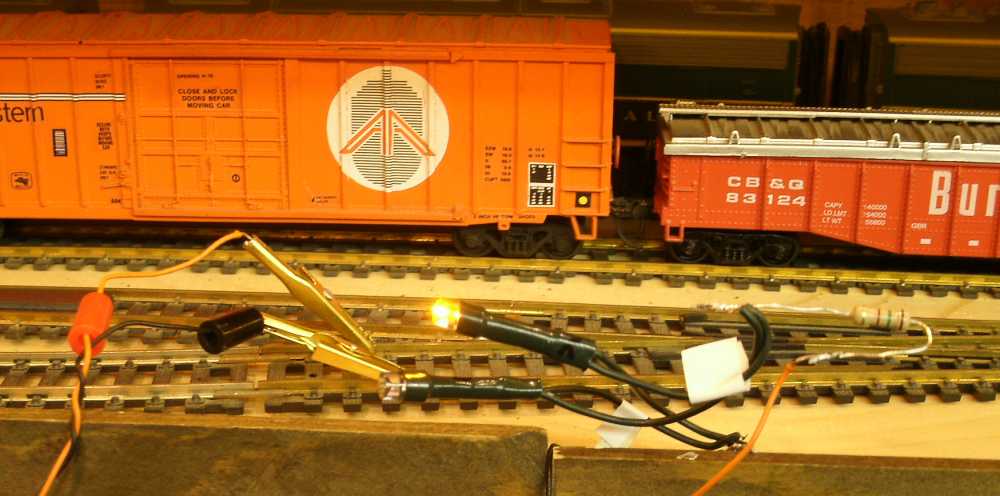
I did test and 'abuse' one LED to the maximum that my model railroad power pack would put out and it didn't burn out and it survived the reverse voltage. I calculated and experimented with the value to use for the resistor, the original unit has a 15 ohm resistor for use with the 3V battery supply. I tried a 150 ohm, and the resistor would warm up 30 degrees after 10 minutes. Then I went to 300 and finally 1000 ohms and am satisfied that it can now run 'forever' with out trouble, and the brightness of the LED 'looked right' without overdriving it and shortening its life. In the darker corners of my room, I have tried a 15K ohm resistor, and the light was almost dim but was a good judge of track voltage vs. brightness. Most of my locations are now 3K to 10K. I only have some old 1/2 watt resistors, maybe from 1983. And since there is no more Radio Shack, I am making do with old packages that I had for years, from the last century. I don't have enough of any one size, and I won't be mail ordering any yet. Below is a test set, with gator clips and the green wires from the original string. I used one LED from a Red set, and one from a Yellow set, and my own larger resistor to suit my train supply voltage. |
|
My purpose with these LED's on the model railroad is to confirm track direction and power. Direction is easy, one is lit and the other is dark. Power or voltage is harder. I have a remote control throttle (also homemade, in 2000) and if I am out of sight of the train power supply, I sometimes don't realize how high I set the throttle. And the track direction. If the power is high and the locomotive isn't moving because of dirty wheels or I forgot to throw the block switch or my 3 reversing auxiliary block switches, then I sometimes get caught with a runaway train. A grain of wheat bulb is really good to watch track voltage; the brightness varies and corresponds well with track voltage.
The LED brightness doesn't correlate so well, it likes to show the same brightness whether the track voltage is 7 volts or 12 volts. But with a 10,000 ohm resistor, the LED is well protected and the brightness relates ok to track voltage in the lower half of the range; and in the upper half it has constant brightness.
My track signalling isn't for train control, it's for track voltage monitoring and direction. This is useful because I have 3 reverse loops and wyes and main and auxiliary blocks to manually reverse power as needed. |
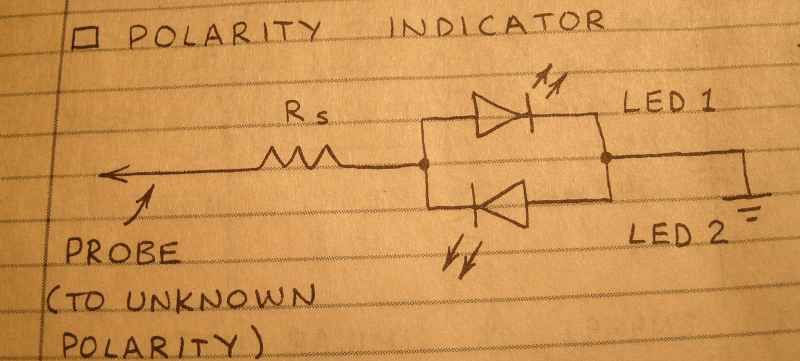
| Here's the circuit to show polarity = train direction |
|
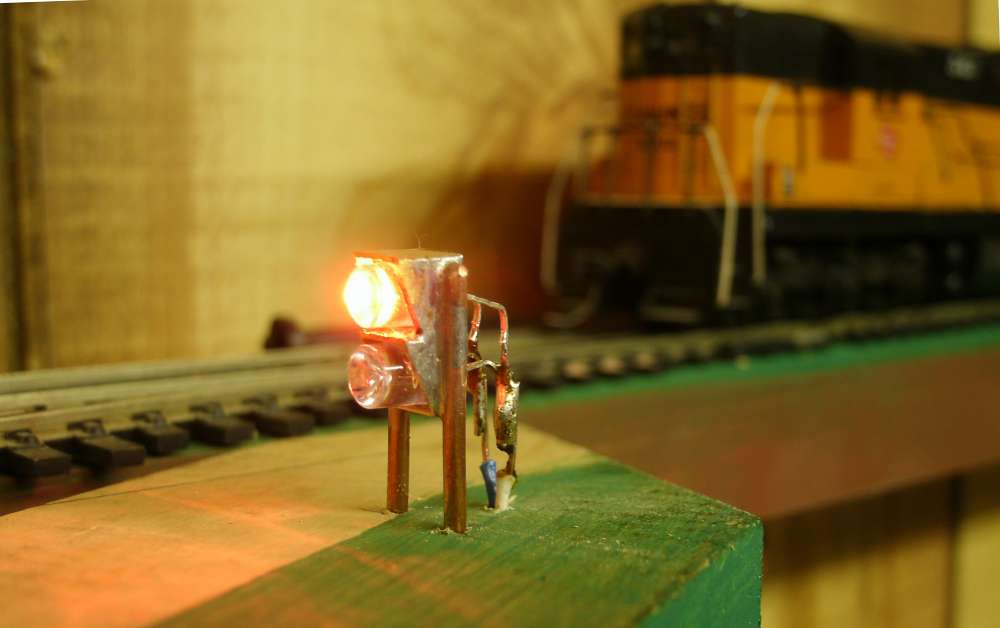
To hold the LED's, I cut some 1/4" square brass tube into a box shape and pressed the LED's in. The two 14 gauge wires are support posts, soldered to the sides of the boxes, and set into holes drilled in the train board. The LED leads and my connecting wires are in the back; I could form them better to look like a signal maintainers ladder. Or at least paint them black so they are 'camoflaged'. I should paint the sides of the brass boxes; in this picture they are shiny with solder. Or I could think of that as being a modern aluminum signal head. I mount the resistor out of sight below the train board. If I needed to make a truly accurate scale model signal, then I could consider leaving the LED's in their original green shrink wrap and green wire, and mount the LED's below the board and use some fiber optic light tube to bring the colors up above the board to a realistic looking scale size signal. |
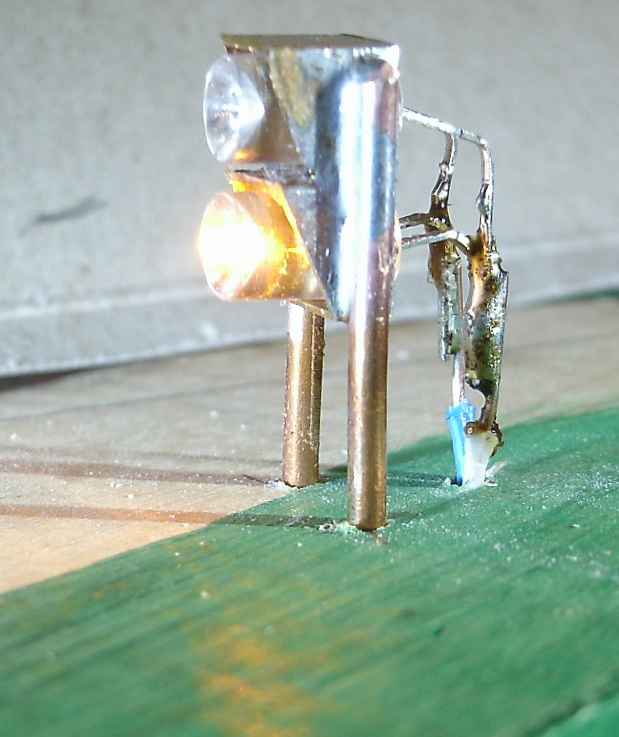
| I use this simple signal as a dwarf style. It doesn't block the view of my train and scenery (which is just a painted board). The epoxy of the LED comes shaped to let light out the end and the sides, which may not be realistic for a model railroad, but it's very useful in my train room because I can see the status all the way from the other side of the basement, at 90 degrees from the track. I could have let the brass box hide the side light, but I have a use for that. Or I could have made a fuller brass box and then drilled a little hole to let some light out the side, aimed just where I want it. |
. . . . . to My Main Index Page on the TrainWeb site.
This project and page were made in December, 2019.


