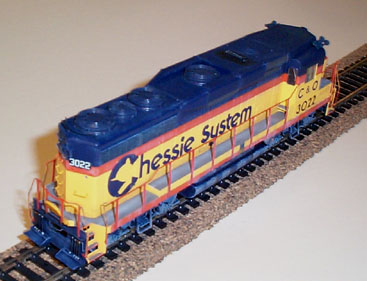
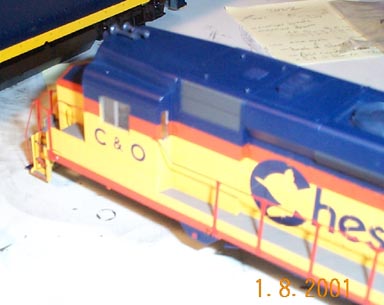
I purchased mine through the Chesepeake & Ohio Historical Society. Mine came with C&O sublettering but no road #. I am making it #3022. The #3000 and #3001 are slightly different than the #3002-47. Below is a Dean Heacock pic of #3022.
How to make a Proto 2000 GP30...
1. Making a Proto2000 GP30 is not difficult at
all. Mine came as you see in the first pic below. What you
will basically need to do is paint some details the correct color and weather
it. First things first, choose a road number and put those decals
on.
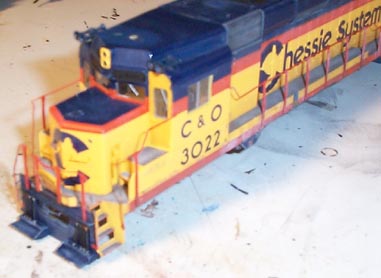
2. The number one problem with the P2K model is
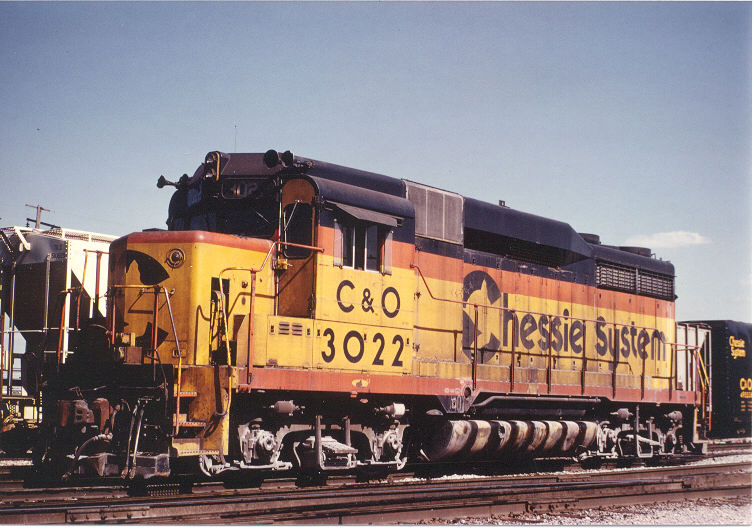
the horn location. The Chessie C&O GP30's had the horns on either
side of the raised portion of the roof. See prototype pic above for
correct location. Remove the horn from its current location by twisting
it off. Fill the hole with a drop of superglue. Cut the one
flute of the horn that faces backwards off, this will leave just the two
that face forward. Buy a Details West three chime Leslie horn and
paint it blue. Leave all three flutes on this one.
3. Drill holes in the roof for the new horns.
Insert them and glue them down from the inside of the shell.
4. The nose grab iron should be 1/2 blue and half
yellow that is in front of the cat logo on the nose. Paint all grab
irons in a yellow area (and the two drop steps) UP Armor Yellow.
They are too translucent to look realistic. Paint the one grab iron
in the orange stripe on the back orange. It comes yellow from P2K.
Paint the two drops steps on the back in the blue area C&O Enchantment
blue.
5. Paint the back of the stairs blue. Also
paint the back sides of the pilots blue.
6. Paint a small rectangle on the sill between
the second and third handrails back from the cabin blue. This is
going to be where the ACI card used to be. These units were delivered
in blue paint and got ACI cards attached. When Chessie painted them
in their scheme they did not take off the ACI card. Later, when ACI
cards were no longer needed, they were removed, revealing the original
C&O blue scheme below. See pic above for evidence of an old ACI
card.
7. Paint the bottom 1/2 of this rectangle yellow.
See my pic below for more clarification.
8. Fill in the gaps in the "Chessie System" logo.
The factory applied paint does not fill the gaps in the doors with paint.
Go in with a fine brush and fill these gaps with blue paint.
9. Paint the numberboards black.
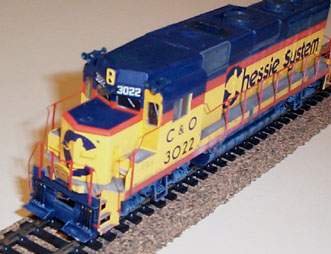
10. Paint the front left door yellow. See
pic above. The #3022 had one door replaced and not painted.
This makes for a very interesting look.
11. Paint the frame of the grills right behind
the left side of the cabin grey. See pic above. These grills
obviously
were replaced, but they too were never painted.
12. Pop the two undecorated figures out of their
seats. Paint them and reinsert them.
13. Paint the coupler several shades of rust.
14. Paint the MU hoses yellow, red, and green just
at the connection to the pilot. See pics above and below.
15. Weather with drybrushing the sill with white
and orange mixed. Drybrush the underside (trucks and fuel tank) with
blue and white mixed. Drybrush the top with the same colors.
Drybrush around the exhaust on top with black and dark blue. Put
a wash of dirt color around the bottom 1/4 of the locomotive. Take
and eraser to the wash when it is dry. Leave just as much "dirt"
as you want.
16. Tape over the windows. Spray the entire
locomotive with dull coat.
17. Streak the fuel tank with oily black to simulate
fuel stains. This will be glossy, which is how it should look.
18. You are done. Enjoy your locomotive.
Below are starting pics of my GP30. Enjoy.

Below is the front of #3022 with steps 1-15 complete.
The old horn hole has been filled and sanded, but not yet painted over.
I left it there so you can compare where the new and old horns went.
Notice in both pics you can see where the ACI card used to be on the sill,
just below the "H" in the left pic, and the "second S" in the right pic.

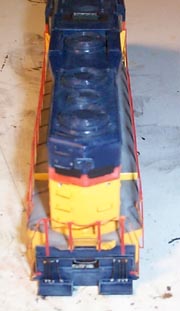
Below are two pics of the #3022 with steps 1-15 complete.
The left pic shows how I filled in the back of the steps blue. Look
at the steps in the back, the sides and rear of them are blue now.
This makes for a much better look then leaving them yellow. The right
pic shows the back of the unit. The MU hoses with their color coded
attachments are visible, as are the silver attachments (bottom of black
hoses). The grab irons have been painted too. The one in the
orange stripe was originally yellow.
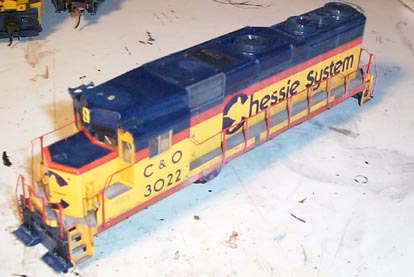
Below is the side view of the finished locomotive.
Notice the tiger striped fuel tank (just like the prototype photo above).

Below are two pics of the finished locomotive. One
from the back and one from the front.