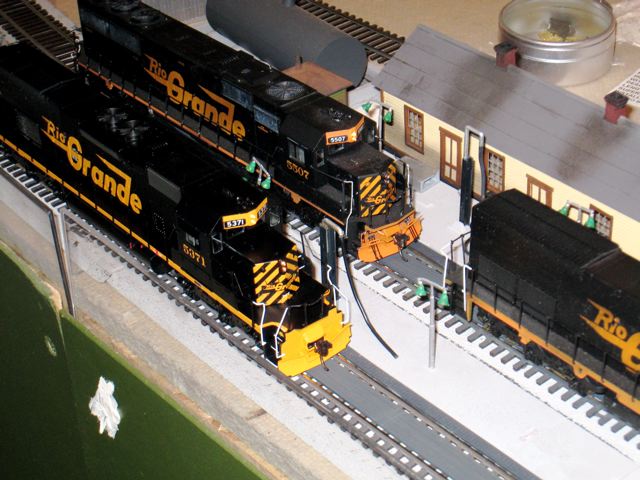
The Athearn model represents the second group (below), however the first group is almost identical and would provide
more numbers to model.
D&RGW 5341-5355 (15 units)
Built in October 1974
EMD order number 74636
diagonal lifting slots at top corners of pilots; top corners of front pilot later notched and new lifting slots cut lower down on *some* units
front MU connection box on deck above pilot
Mars warning light mounted in nose (many units got Pyle Gyralite replacements in later years)
81in nose w/ ratchet handbrake
early cab subbase doors
bolted cab side window plate
delivered w/out vents on side of cab, but added later, usually *rearward* on engineer's side, but *rearward* on fireman's side on a few units
Nathan M3 airhorn (some units changed to Nathan P3 beginning in the mid-1980s)
early stand-off style electrical cabinet air filter box (as on the SD45T-2 model)
bolted (at top) radiator access doors (hinges at bottom)
delivered w/out numbers on rear flank above radiator intake screens, orange (and even *white* on a few units) stencil numbers added after delivery
square pilot, short slots on the battery box doors (Nathan Z.)
* D&RGW 5356-5373 (18 units)
Built in July and August 1975
EMD order number 756046
diagonal lifting slots at top corners of pilots; top corners of front pilot later notched and new lifting slots cut lower down on *some* units
front MU connection box on deck above pilot
Mars warning light mounted in nose (ditto on replacements)
81in nose w/ ratchet handbrake (D&RGW 5357 refitted prior to May 1980 with 88in nose and a Gyralite mounted on a box welded to the nose due to wreck repair.)
early cab subbase doors
bolted cab side window plate
delivered w/out vents on side of cab, but added later, usually *rearward* on engineer's side, but *rearward* on fireman's side on a few units
Nathan M3 airhorn (ditto on replacements)
older stand-off style electrical cabinet air filter box
bolted (at top) radiator access doors (hinges at bottom)
delivered with *orange* numbers on rear flank above radiator intake screens
The first delivery (5341-5355) was built in 1974 and was equipped with the 81" nose, ratchet brake lever and short
slots on the battery box. The Athearn model is very close with the 81" nose and ratchet brake lever, but has longer
slots on the battery box which I consider a "minor" difference when you see actual pictures of these locos.
The second order (5356-5373) was built in 1975 and was equipped with the 81" nose and ratchet brake lever, but had
longer slots on the battery box. The Athearn model matches this delivery exactly. However loco 5357 was involved in
a wreck and rebuilt with a 88" nose and wheel-style brake handle similar to the follow-on deliveries.
The 3rd, 4th and 5th TM orders (5374 thru 5413) have a brake wheel in place of the ratchet brake lever and an 88"
nose - these are a noticeable difference. The nose light for the 4th order (5374-5385, built 1977) protrudes a
noticeable amount (a box-like fixture), but the 5th order reverted to the "normal" DRGW nose light style. These
would not be a good match for the Athearn model in my opinion.
With regard to the the Positive Train Contol (PTC) "box" located behind the cab door on the left side, this was a
modification added to all units in the mid '80s so that is not really important when selecting a loco number.
In my opinion any number from 5341-5373 would be appropriate for the Athearn model. Steve may have some additional
comments.
-Joe
Not so quick there. There are two other discrepancies between the model and the second order. They are on the front
half of the locomotive. It is common to all EMD �-2� locomotives of that time frame. -Steve
Super-detailing Athearn's Rio Grande SD40T-2 - courtesy of Joe
Here is a rundown on what after-market detail parts can be added to the Athearn model
and a few changes that can be made to make it a more accurate replica of the Rio Grande's second order,
units 5356-5373 or convert to first order 5341-5355 .
Pilots
Replacement plow w/ open doors: DW 155
Coupler lift bars & brackets: DA 2211 gives you both, DA 2212 for
the lift bar alone or OMI 9151 (OMI 9152 if modeling 5341-5355)
Since the plastic brackets are very fragile, you may want to use the
brass ones instead: DA 102213
Train line air hose: DW 302
MU hoses: DA 1508 or DW 294 or OMI 9349
MU stand on front deck: DA 1505
MU cover on rear pilot: DA 1505/1507 receptacle & cover only (Cut
in half horizontally and snug up against the underside of the
anticlimber.)
Drop step: DA 1404
Coupler lubricator cup & line: scratch from styrene rod, shim brass
and very fine wire
Diagonal lift slots: drill out & carve to shape
Trim the lower corners of the hose tray on the rear pilot at 45�
Bottom corners of pilot should also be at 45� instead of notched:
fill in with sheet styrene, then trim at 45�
To model units 5341-5355 from the first order fill in the notches
in the top corners of the front pilot with sheet styrene.
Nose
The model comes with a replacement Pyle Gyralite. For the as-
delivered Mars light: DA 1007 or DW 290
Note: the slope on the bottom of the nose notch looks a bit shallow,
so you might want to make it a bit steeper by slicing it with a knife
while you're at it.
Sand filler (very shallow on model): DA 3001, or just use DA
1505/1507 MU cover
Cab
Vents: DA 1902 or DW 122, add as per photos of individual units
Wind deflectors/mirrors: DA 2312
Windshield wipers: AL 29200
Step under number board: short length of bent wire
Blue flag bracket: short length of bent wire, center of cab side
beneath window on engineer's side only
Leslie Tyfon 3L horn if your unit got a replacement: DW 190 or PIA 155
Replacement Nathan M3 horn should you break the one supplied: DW
186 or OMI 9004 (both brass)
Replacement Sinclair antenna should you break the one supplied: DA
101803 (brass)
Long Hood
Electrical cabinet air filter cabinet: CAN 1903 (The supplied
cabinet has an ugly parting line in the outside face.)
Lift rings: DA 1101 plastic, 101101 brass, 2206 formed wire
Lift tabs: DA 1104 plastic or RF 1015 brass (two at top of rear end)
Rear sand filler: DA 3001, or just use DA 1505/1507 MU cover
Right rear corner grab: form out of wire
Scribe & burnish centerline weld bead in three roof panels behind
dynamic brake insert
Add paired rivet batten strip to cover groove between first and
second roof panel behind dynamic brake insert: RF 6206 (photoetched
brass)
Marker light brackets at rear rear corners at same level as
classification lights: fashion from small bits of styrene
Walk light slits at rear corners and on rear end: small strips of
white or silver decal
ACI label & plate: decal on .005 styrene or shim brass on fourth
handrail stanchion behind cab
Deck Sills & Underframe
Small filter beneath front cab step, fireman's side only: use DA
1801 or DW 276 can antenna or short length of styrene rod or scrap
runner
Air glad-hand connector immediately behind the above filter, both
sides: cut short length from DA 1508
Replace jacking pads: CAN 2154
Replace handbrake tensioner: CAN 2152
Ground light, engineer's side only: DW 172 or OMI 9708
Rerail frogs: DW 119 for older "butterfly" type, OMI 9375 for the
later type
Air filter & moisture trap: DW 139
Air pipes in/out of air reservoirs and filters: wire
Drain cock & moisture trap at rear end of air reservoirs: comes
with CAN 2155, use very fine wire for drain line down along side of
fuel tank
Traction motor cables where they show: DW 224 or wire
Trust plates on deck sill at rear: decal
Fuel Tank
Add second, rear fuel filler: supplied
Breather up and down pipes at front of fuel tank: supplied
Drain bar, rear of fuel tank: supplied
Sump drain tank: supplied, BUT note that the drain hose goes
straight down, it does NOT bend in and then down to run against the
fuel tank.
Air box drain pipe, front and rear of fuel tank: supplied
Various additional drain pipes: use supplied or CAN 2156
Trucks
Air lines to air cylinders: wire
Speed recorder: DA 2807 or DW 284
Sander brackets & lines: DW 330 plus fine insulated wire
Note that 5356-5373 were delivered with inboard sander lines, but
they were removed at some point, leaving just the outboard sander
lines, which will interfere with the steps.
AL = A-Line (Walthers manufacturer number 116)
CAN = Canon (191)
DA = Details Associates (229)
DW = Details West (235)
PIA = Precision Investment Associates (PFM)
OMI = Overland Models Inc
RF = Railflyer Model Prototypes (631)
More involved changes that could be made:
Change coupler plates (coupler pockets)
If there is one thing that mars this model it is the overly wide
coupler pocket, or coupler plate. Manufacturers
insist on making the pocket wide enough to slip the entire coupler
box through the opening, which is what makes it so grossly wide.
The walls of the pocket itself are all that is needed to
constrain the coupler.
Add the recess to the right of coupler plate
While you're at It this should be easy enough to drill and file into
the pilot and then back it up with a scrap of sheet styrene.
Move dynamic brake vent back
On the model this rectangular vent is mounted on the rear portion of
the dynamic brake insert, but it should be in the next roof panel
back, a bit ahead of center.
If you really want to take it further you can replace the steps
with see-through photo etched treads from Canon, and add safety tread
deck plates from Canon or Railflyer.
Detailing Athearn's Rio Grande SD40T-2 addenda
Posted by: Jim Eager
Date: Wed Nov 28, 2007 2:10 pm ((PST))
After spending a couple hours looking at photos of the fuel tank area
of the SD40T-2s, I think I have the various drain plumbing figured out.
There is a small diagram at the bottom of the Athearn parts sheet
that shows where some of the pipes go. The rear of the tank is at the
left, the front of the tank is at the right. None of the pipes are
numbered, not all pipes are shown, and the Grande Units did not use
all of the pipes that are shown or supplied.
Here are the ones to use:
Front of fuel tank
Breather Down Pipe -- This is supplied pipe nos. 4, 5, 6. However,
this pipe does not jog in and then up on any of the Rio Grande units
that I looked at, so you can cut off the final upward jog.
Breather Up Pipe Base -- This is not identified in the diagram, nor
numbered on the part runner. It's a small wedge that straddles the
web behind the fuel sight glass.
Breather UP Pipe -- Five different lengths are supplied: nos. 8, 9,
10, 11 and 12. It looks to me like no. 10, 11 or 12 will be the right
length. Note that this pipe bends in to clear the fuel filler neck.
Not shown is another pipe that comes down from the center of the
underframe just behind the rear traction motor, then bends to run
toward the front of the fuel tank, then bends to run down along the
tank. Supplied pipe no. 7 should work perfectly for this pipe.
Rear of fuel tank
Drain Bar -- add this along the bottom edge of the tank as shown
Air Box Drain Pipe -- This is supplied pipe no. 3 (2). I have not
seen this vertical pipe on any Rio Grande unit that I've looked at,
but I do see a horizontal pipe with just a downward elbow at the
outer end. You can use one of the spare supplied pipes no. 2 or 13
for this pipe if you cut off the short bit beyond the elbow off the
long portion.
Sump Drain Tank -- No part no. on runner. This is on all of the
Grand's tunnel motors. Make sure that you install the part with the
hole at the bottom of the outer end.
Sump Drain Pipe -- This is supplied pipe no. 14 (2), but on Grande
units the drain hose just runs straight down and does not bend over
to touch the fuel tank, so just use a short length of .030 styrene rod.
Some photos show two other pipes running down the rear of the tank
on some units. One, just right of center, has a T fitting at the
bottom end. This pipe is not supplied, but it is in Canon set 2156.
The other is a straight pipe just to the right of the T pipe. Use
supplied pipe no. 3.
That should about do it.
Oh, the coupler lift bar on the rear pilot does NOT have the loop
handles.
Activating a Mars light effect in your new Tunnel Motors
by Joe Snoy & Steve Orth
Both Steve and I have activated a flashing Mars light effect in our
Tunnel Motors (TMs). As delivered, Athearn's TMs have all the forward
lights ganged together and activated by F0 (no flashing Mars). Here
are 2 options for activating a Mars light on the nose of your TM.
Steve implemented Option 1 (lights wired in parallel) and I
implemented Option 2 (lights wired in series) with some help from Steve.
Option 1 (Steve's method - light bulbs wired in parallel)
Steve used a NCE D-13SR decoder (easy to program the CVs).
Disconnect the nose lights from Athearn's light board - leave the
upper headlights connected.
Solder a single ~360 ohm resistor to
the combined wire leads from one leg of both bulbs (trim the wires
and resistor as needed).
Cut the Green wire leading from the Decoder
to the Athearn circuit board and solder the resistor to the decoder
Green wire (Output 1). Note: the Green wire does not have to be
connected to the circuit board.
Next, solder the other end of the
light bulbs to the decoder Blue wire. Do this by carefully scraping
the insulation from some convenient point on the Blue wire that leads
from the decoder to the Athearn circuit board. Unlike the Green
wire, the decoder Blue wire must remain connected to the circuit
board to complete the headlight circuit.
Reattach the shell to the frame.
The Mars light should now be activated "ON/OFF" by F1. Steve's likes
to reprogram the output of the Green wire from F1 to F3 (He can
provide the details how to do this). Also I think he needs to
provide us with the CV values to adjust the flash rate of the Mars
light.
Option 2 (Joe's method - light bulbs wired in series)
Joe used a Digitrax HO-163D decoder (more difficult to program the CVs).
Disconnect the nose lights from Athearn's light board.
Shorten one
lead from each bulb and solder these together (i.e, in series).
Solder a single ~620 ohm resistor to one leg of the bulbs (trim the
wires and resistor as needed).
Cut the Green wire leading from the
Decoder to the Athearn circuit board and solder the resistor to the
decoder Green wire (Output 1). Note: the Green wire does not have to
be connected to the circuit board.
Next, solder the other end of the
light bulbs to the decoder Blue wire. Do this by carefully scraping
the insulation from some convenient point on the Blue wire that leads
from the decoder to the Athearn circuit board. Unlike the Green
wire, the decoder Blue wire must remain connected to the circuit board.
Reattach the shell to the frame.
The Mars light should now be activated "ON/OFF" by F1. For the
Digitrax HO-163D decoder I programed CV 51 to 34 which gives me a
nice double-pulse flash effect.
Other installation variations are possible depending on the decoder
you choose and the function key you want to use to activate the Mars
light effect. The most tedious aspect of the installation is
attaching one leg of the bulbs to the Blue decoder wire. Unlike the
Green wire, the decoder Blue wire must remain connected to the
circuit board to complete the headlight circuit.
Steve's comments:
The Digitrax Mars light effect will be better. The NCE flash rates and
brightness are not programmable. Digitrax uses their memory to allow
programming that stuff, but they have no memory allocated to hex-to-decimal
conversion, thus the more difficult programming. NCE uses the memory for
conversion. I like the Digitrax lighting effects, but I *hate* programming
those things. I have one in a DRGW SD45. It does look good.
I ran my 32 car hopper train with a SD40T-2 and a
SD50 on the point, a SD40T-2 and a SD50 as the swing helper, and a SD40T-2 as a
rear pusher. Pretty cool. That's Rio Grande railroading at its best!
More MARS Notes
Disconnect the nose lights from the light board. I'd change the wiring
to connect the nose light bulbs in series. They are in parallel now.
We do this so that if one burns out, both lights go out but the good
bulb stays good. If you leave them in parallel and one goes out, the
remaining bulb will see twice the current and will light *really* bright
for a while, and then it will be forever dark.
Solder an ~630 ohm resistor in series with the bulbs. I think the
closest common resistor is a 610 ohm. That will be fine. Connect the
bulb and resistor circuit to Output 1 on the decoder (Green wire). I
don't think there's a connection on Athearn's light board, but I may be
wrong. Probably worth checking on tonight.
Program your decoder to put output 1 to a function key. I like to use
F3 because F3 is not used by anything decent on sound decoders (usually
the stupid sounding "coupler crash" that sounds more like some kind of
dying animal). Program output 1 to be a Mars or Gyralight. They are
different, but sometimes one looks better than the other.
Don't attempt to use an LED for the Mars or Gyralight. LEDs do not turn
on and off slowly. They tend to be full on or full off, and you need
the dim-bright-dim-bright.... action for the simulation to look good.
-Steve


 Super-detailing Athearn's Rio Grande SD40T-2 - courtesy of Joe


