


![]()
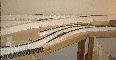
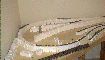
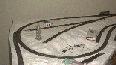
These pictures show the process I used to test fit track. I drew a 1ft by 1ft grid on the foam board and then followed the schematic I made for my layout, laying the pieces out and marking the outside of the ties with a sharpee.


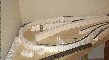
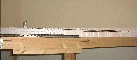
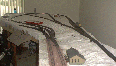
After test fitting the track I installed Woodland Scenics risers upon which I later installed the track permanently.


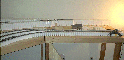
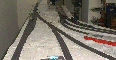
This shows the completed trackwork. After laying down roadbed I white glued the track down. I used a one inch paint brush to spread white glue under the flex track and tacked it down with push pins to dry. I used Atlas code 83 flextrack and Atlas #6 switches throughout, with the one exception being the curved switch on the left hand side of the layout. It is a Walthers product, also code 83. All but two switches will be hand thrown by Caboose Industries Ground Throws. The curved switch and the entrance to the passing siding in the back corner will be thrown by Tortoise Slow Motion machines (or at least, that is the plan for now). I have never installed the Tortoise machines, but the instalation seems straight forward, and I do enjoy the way they operate. Ballasting had begun by this time, as can be seen near the freight depot, and it is now completed with the exception of one siding. It is Arizona Rock & Mineral Company "Mauve" N-Scale ballast (I like the finer texture). The usual technique is being used of securing the dry ballast with "wet" water and then dropping a dilute white glue over top, though if I had to do it again I think I would use rubbing alcohol instead of "wet" water. I had great success with that in some touch up work I did.
![]()


