


The Signal
Vol 1 No. 2
January 1999
![]()
Contents
Modules, Shelf Layouts & Dioramas
From The Signal Tower - Commentary
Roster - Member Profile
Train Tips - Car Weight
Building an End-of-Train Device
Train Tips - Scale Speeds
Signals Special Interest Group
World Wide Web URLs
All Aboard!
Greetings friends and welcome to 1999, the final year of this millennium (I think I may get very bored with hearing that in a very short period of time, haha). With the Christmas festivities behind us now I am sure that for many of you, this is the beginning of the "serious" modeling season. It is for me!
In this, the second issue of The Signal>, I hope that the articles contained here will be both informative and thought provoking. It is our objective to help the new modellers get some ideas and confidence to try some projects, as well as stimulating the imaginations of the more experienced members of our group. Please remember that this is our newsletter and it is limited only by the amount of effort that we all are willing to contribute to it (that is a gentle reminder of the need for articles and ideas from each and every one of you, haha).
Go and grab a cup of your favorite drink now, sit back in that comfortable reading chair you have and let's talk trains!
Greg
Back to Contents
Back to Newsletter page
Modules, Shelf Layouts & Dioramas
by Greg Sargent
I have a particular love for anything miniature (that must surely explain why I am modeling in this scale) and that holds true not only for the size of the model, but also for the size of the layout. I really enjoy operating on a large club layout, don't get me wrong. However, if you really want to get my heart fluttering and my interest picked...show me a finely detailed miniature railway display, then leave me alone for a few hours!
Now many of you reading this might already be asking yourselves, "what, isn't bigger better? It's the western way!" Let's begin by looking at some of the rational behind going smaller, at least to begin with.
In a recent article in one of the popular magazines on the subject, I was looking for track plan ideas for one of these "little jewel" layouts. Quite by accident, I came upon a story about pikes in Europe and their philosophies. Due to space restrictions in many of their homes, they are forced to make their layouts quite small by North American standards. Once my curiosity had been sparked I sat down and really got into the article. The reasoning of the author was excellent and I can see no reason why this cannot be applied to the modelers in this country just as easily. I am not the first to say this (but that doesn't make it any less true, haha) that the most widely heard excuse from the armchair modeler is, "I don't have enough room for a layout".
We have been conditioned to think that if you cannot devote the best part of a basement or even a large single room to a railway display, then there is no point in doing anything. Hog wash!
The building of a layout takes time and obviously the bigger the project, the longer the time. In fact in most cases in this country, we are talking years...many years. With the smaller shelf style displays, building time is more realistically in the two to four year range. This then gives the modeler some feeling of accomplishment in a much shorter time frame and... this is a very big AND, you can hone your skills on the first one or two and by the second or third attempt you will really have something of craftsman quality. (Many European modelers sell, tear down or simply give away their displays as ideas change, construction skills improve or boredom simply wins out.)
Compare this to the ten, fifteen or twenty year "life time" layouts and you can see that unless you are willing to go and start over on the areas where you were in a very steep learning curve (lets hope that was not on the benchwork or track laying, haha) you must live then with those areas that are not as refined as your later work.
By building a miniature railway in the 2 x 4 foot to 3 x 15 foot range you will be able to enjoy the experience of such an undertaking and get up and out of that chair and really get your hands dirty. (After all, isn't that where the real fun is in this great hobby?) Instead of just listening to the guys talk about their lifetime projects, you too will have the personal satisfaction of completing a model railroad and having someplace to operate and display those wonderful little gems, that up until now, you've just kept stored in a box or a sterile display case.
Okay, so there is some of the reasoning behind the thinking. Now where to begin? In my case, I have three such projects in various stages of construction. One is a 4 x 4 foot coffee table display (and I don't even drink the stuff), the second is an 18" x 36" switching module; both in N scale. And my third, that is just on paper still as I write this, is a 2 x 4 foot Z scale display. (I don't do anything in a simple way, do I? Haha)
I suppose the most basic of places to start would be a four foot module designed to fit into the club layout. Here the track standards are already laid out and other than a theme for the module, you only have to do a little bit of track laying and wiring. The bulk of your efforts can go into scenery construction and structure building.
All the same planning steps, that would go into an entire basement empire, must still be followed even for the smallest of projects. Pay attention to the aesthetics of the track plan (radius of curves, track clearances, etc.), as well as what opportunities you can create for operation too.
Always keep in mind that the most successful railway displays utilize many artistic principles: design, color, texture, points of interest, focal points and appeal to the senses. Weathering (now here's a point to get into a silly argument over) is the addition of "atmosphere" to our models. It brings the outdoors, indoors. My feelings are that EVERYTHING should be weathered. That includes all locomotives and rolling stock right up to the structures, the track and ballast, the trees, the ground cover, figures and vehicles... absolutely everything.
Okay, so the module idea doesn't really appeal to you because you would like to keep this display at home and have a little more "operation" than a single module would provide... what then? How about three modules together and setting them up somewhere in your home where you have room. Or, like I have on the go, a coffee table that offers functionality as well as either a continuous run or switching possibilities.
I like the idea of having a very small display that I can set up almost anywhere in my home or put in the back seat of my car and take it to shows and conventions with me. Thus my 18" x 36" switching diorama. This one is a modified version of a plan that appeared in Model Railroader magazine many years ago; the Gum Stump and Snowshoe. I modified the plan slightly and provided for the possibility of adding on with more sections in the future if the desire hits me.
One concept that seems to be very popular on the European displays is the concept of dividing the benchwork area laterally so that a backdrop actually hides a "fiddle yard" out of sight from the viewers. This is where the operator can stage trains, taking them on and off of the display and it does not effect the visual impact of the diorama. For example, if you have a miniature layout with the dimensions of 24" x 96", the front 18" (or so) would be for the display and the back 6" utilized as the staging area. The trains actually disappear into and out of tunnels at either end as they "enter and exit" the stage. This concept too, hides the tight radius of the end curves from view.
If you browse the magazines and the track plan books (don't forget the European mags as well) you will find an entire wealth of ideas and possibilities. Hopefully this has"wet" your appetite to try a miniature gem. Now start imagineering the project and lets do some modelling. Don't forget the possibilities of adding lights to the scenes and the beautiful addition of sound too! (Listen... is that birds I hear in those trees?)
John Allen began his great empire, The Gorre & Daphetid as a very small railroad. This is where he sharpened his modelling skills and his sense of "right". He went on to build one of the most famous railways in the history of this great hobby. It owed much of it's success to John's getting the "bugs" out before he tackled an entire basement full of track, mountains, benchwork and wiring! This idea can give you the experience you need to undertake that "dream" layout someday or it might make you an adamant fan of the "jewel layout" concept. Remember though, above all else, keep it fun!
Back to Contents
Back to Newsletter page
From The Signal Tower
by Greg Sargent
With the Christmas decorations barely back in the basement for another year, there has been little time for the guys to work around the club or plan many things since the last newsletter.
The ESMRE had another successful fund-raiser for the Youth Emergency Shelter, donating $500. to their program. This was comprised of donations totaling just under the five hundred amount and the balance made up from club funds. Good work, Guys!
The plans for the additional N scale modules had been shelved over the Christmas season, but are about to be hauled out again and looked at very seriously now. There is a meeting on the subject scheduled for January 21 and there should be more to report on their progress by the next newsletter.
The club is still waiting for some samples of yard signals from club members. I am still at the drawing stage with mine, but will hopefully have a sample in the next few weeks. If you have any ideas, the club needs your help. Please keep in mind that if they are going to effective and useful, they will have to be able to been seen clearly at our viewing height and not from the cab of an N scale locomotive.
There will be an envelope marked The Signal hung on the cork boards at the back of the layout room for any contributions for our mag. Please make a mental note that copies of articles from other magazines cannot be used in our newsletter because of copyright laws and the fact that we put The Signal on our web site for all the world to see. (Sorry guys, that includes cartoons too.)
February 12th to the 14th, 1999 are the dates of the Model Railroad Show in Calgary this year. There will be a contingent from both Yellowhead and N Scale going this year. If you are able to go, please insure that Dennis has your name. Our group is planning a 14 module display, so at least a few able bodies will be need to both take down and load, operate in Calgary and re-setup again once the guys get back to Edmonton. Please lend a hand if you are able!
Back to Contents
Back to Newsletter page
The Roster
"Our Member’s Profiles"
Once again we are featuring a profile on one of our own and this issue will highlight our group's coordinator Dennis Barker.
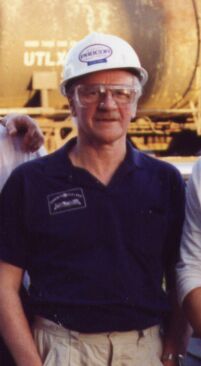
Dennis Barker on a tour of the local Procor plant
Dennis was born in England and like so many of us, began his railroading with an "O" scale, clockwork, toy train. From there he progressed to "OO" which is still popular in Europe and is close in size to our standard HO scale.
With an interest in the prototype as well, Dennis was a member of an English "Train Spotting Society" in which the idea was to collect locomotive numbers in a given area. Part of the fun too was that the groups would organize field trips to other locales in order to let their members expand their lists and enjoy some railroading in other places as well.
As frequently happens, Dennis took a "sabbatical" from the hobby for a period of time while other, more important things, dominated his life. It was during that break that he moved to Edmonton and as they say, "the rest is history".
In 1976, the "bug" bit Dennis again and he was back in the hobby for the long haul. N Scale was his passion now and until 1991 he considered himself a "Lone Wolf" in the hobby. It was in May of that year that the Edmonton N Scalers were born under Dennis and Laird Sherwood and the history of our club began.
When asked what aspect of the hobby he enjoys the most, he is quick to answer that it is the maintaining of the locomotives and the painting of them. Dennis has a beautiful collection of both locomotives and rolling stock that run as smoothly as you would expect from someone who enjoys perfecting them.
Dennis has a home layout under construction as well. Although his roots were across the ocean in Britain, he is thoroughly involved in North American railroading now. Dennis still has a few items of European flavor in his collection, but odds are that next time you visit the club you'll find him behind the throttle of a pair of CN dash 9s pulling an empty grain train out of the yard and onto the main.
Dennis's dedication to our club and to N scale as well, has rubbed off on many of us. Through his friendship and commitment to the hobby he has helped to make the Edmonton N Scalers a great group to belong to. Two words from all of us to you Dennis...thank you!
Back to Contents
Back to Newsletter page
Train Tips
Having problems with a certain car that won't stop derailing? Have you checked it's weight? Because of the inherent light weight of N scale rolling stock there can be problems with a car derailing as it navigates around a layout. The NMRA has recommended that cars should weigh approximately the following:
| Length | Weight |
|---|---|
| 25' car: | 0.80 oz |
| 33' car: | 0.85 oz |
| 40' car: | 0.95 oz |
| 50' car: | 1.10 oz |
| 57' car: | 1.15 oz |
| 85' car: | 1.45 oz |
Back to Contents
Back to Newsletter page
Building an End of Train Device
by Greg Sargent
Nobody misses the beautiful cabooses, that used to grace the ends of all of the freight trains in North America, more than I do!
Anyone wishing to model a modern, class 1 railway today has had to deal with the pathetic sight of an incomplete train disappearing around a graceful curve or snaking out of sight into an old stone tunnel portal. No matter how many times I watch this occur, it always leaves me looking back down the main somewhere for the rest of the cars that must have come uncoupled. Enough said.
Let's add some interest then to the rear ends of our freights with a flashing red FRED (don't ask what this acronym stands for). Lets begin with a parts list:
| (1) | Freight Car (40' or 50' Box car is easiest to work with) |
| (1) | Miniature Switch (your choice, most electronics stores have a good selection) |
| (1) | N size Battery holder |
| (1) | N size Battery |
| (1) | LED Flasher (Radio Shack: 276-1705) |
| (1) | Miniature Red LED (Oregon Rail HO scale signals distributes these) |
| (1) | Capacitor (Radio Shack 470uF 35v) |
| (1) | Micro-Trains Coupler |
| (12") | Very fine Hook Up Wire |
Begin by cutting a slot in the bottom of the Box car away from where it could interfere with the car's trucks. To do this, I drill two holes... one at either end of the slot and then remove the plastic in-between them with a sharp x-acto knife. Make the slot long enough to either access the switch with a probe or so that the slide of the switch will protrude just low enough so that you can move it. (Adjust the height of the switch above the floor of the car with blocks of wood.)
Guess what? You've just finished the hardest part of this installation! Next, change the rear truck over so that the Micro- trains coupler is in place because this is what the red LED is mounted on.
OK, lets continue now by next attaching the wire leads to the LED. For this I like to use a wire wrap tool to make a very neat, secure attachment to the cathode and the anode of the LED. Once you have the wires on each lead, I put a drop of five minute epoxy on and between the leads to seal them and insulate against the possibility of them shorting out against each other.
Let the epoxy set, then paint the back and sides, as well as the wire leads, flat black. (Insure that when you paint that you do not get any on the lens part of LED.) Set this aside to dry overnight and we'll get busy wiring up the simple circuit next.
While looking at Fig.1, it is oriented to correspond with looking at the actual LED Flasher chip from above. (Note that the white dot corresponds with the chip to help you determine which is pin 1.) Attach the capacitor across pins 1 and 2. Next, with a jumper wire, connect pins 1 and 8. It does not matter which side of your battery the switch is wired into, in the diagram I put it between pin 4 and the negative pole of the battery holder. Connect pin 5 to the positive pole of the battery holder.
The final connection is very important, so please insure you are careful about this part. On the LED, one of the leads was straight and the other had a small cross piece near the LED itself. The straight lead is called the anode and is connected to pin 6. The cross piece lead is the cathode and must be connected to pin 8. If you get the leads connected backwards, the LED will not work. Place the battery in it's holder (observing that the polarity is correct) and wait for a moment to let the capacitor charge and the IC do it's job. In a few seconds the LED should begin flashing if all components are good and you were careful with your wiring.
The final stage of the construction now requires that you make a small opening between the car body and it's frame to allow the wires from the LED to pass inside to the circuit you just wired. Your choice here; you can either drill a hole just large enough to admit the wires or take a sharp x-acto knife and cut a very small channel out just above the point where the car floor and car end meet.
I glued the LED to the top of the Micro-trains coupler and where it sits protecting the end of my train.
Note: If you don't like the flash rate you can vary this by changing the capacitor for one of a different rating. (The smaller the uF rating, the faster will be your flash rate.)
There you have it soup fans! It will never replace my beloved cabooses (cabeese?), but it is a huge improvement over half of a train running on your layout. When I first experimented with this circuit, I was curious about how long the battery would last. I set the whole thing up on my breadboard on November 10th/98 and powering two LEDs, it sat flashing until January 16th/99... non-stop for just over two months. I think a battery should last the average operator probably in excess of at least a year before you'll have to change it. Happy railroading!
Back to Contents
Back to Newsletter page
Train Tips - Scale Speed
Have you ever tried to imagine how fast your train is going as it passes the stations and rounds the curves on your layout? You might be very surprised to find out that you're actually speeding through that yard at a very reckless speed... an easy target for the company police and supervisors. Have a look at the following chart and time yourself next run you make down the mainline. Enjoy!
N Scale 1:160
4 actual feet: 640 scale feet
| Time (seconds) | |
|---|---|
| Speed (MPH) | |
| 44 | 10 |
| 22 | 20 |
| 15 | 30 |
| 11 | 40 |
| 9 | 50 |
| 7 | 70 |
| 5 | 80 |
Back to Contents
Back to Newsletter page
Signals Special Interest Group (SIG)
I am very interested in starting a SIG (special interest group) within our club for those individuals that are interested in signals. My intent is to gather those people together to share the diverse knowledge within the club so that we may all learn more about their construction and the electrical circuits that make them function on our layouts.
Back to Contents
Back to Newsletter page
World Wide Web URLs
Kato USA
Walthers
Model Railroader magazine
Micro-trains
Design Preservation Models
Woodland Scenics
North West Short Line
Kalmbach Publishing
Accurail
Trains magazine
Pentrex
N-Scale Supply
Tex N Rails
Caboose Hobbies
Intermountain Railway
MDC Roundhouse
Atlas
![]()
![]()
![]()
![]()
![]()
![]()
Snail Mail address on Schedule page


