Train Formation Diagrams
Fig. 1: Gate Stock Train Formations
1903 - 1906
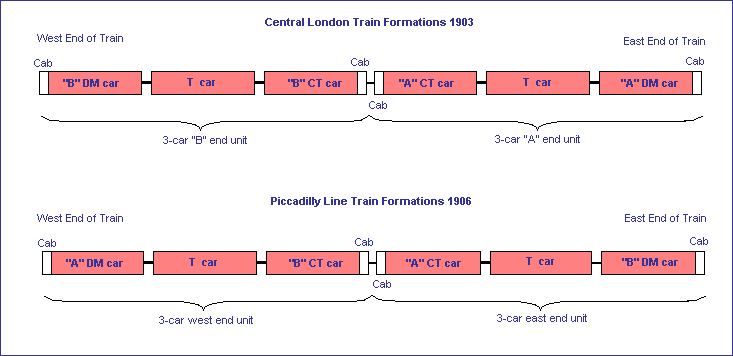
This diagram shows the train formations
adopted by the new tube railways which started multiple unit operation in the period 1903
to 1906. The upper diagram shows a Central London Railway train, where the unit
indentification lettering would look like this, reading from west to east: ‘B’
DM - T - ‘B’ CT + ‘A’ CT - T - ‘A’ DM. Half the
train was the “A” half and the other was the “B” half. Put
another way, there was an “A” unit and a “B” unit. Either unit
could run as a 3-car train. When being driven from the Control Trailer end, power
was provided by the motor car at the rear.
The Central London formation was unique
in the way a 3-car unit had the same letters at each end. The orientation was also
unique in that "A" units normally faced east and "B" units faced
west. The lower diagram shows the LER formation, with the Piccadilly Line as the
example. The Bakerloo and Hampstead formations were similar to the Piccadilly but
orientated north to south. The same 6-car formation was used for Standard Tube Stock
until the introduction of 7-car trains in the late 1920s.
To the Top of this Page
Fig. 2: 7-car Standard Stock Train
Formation
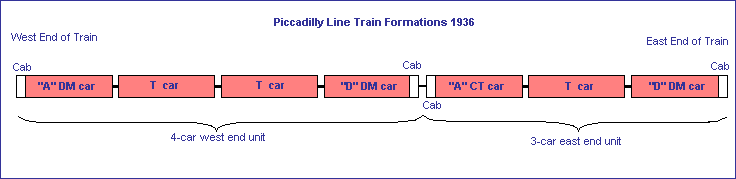
The original, Standard Tube Stock 6-car train formation was
increased to 7-cars by the insertion of an additional trailer car and replacing a control
trailer with a DM car. Trains were now formed: ‘A’ DM - T - T -
‘D’ DM + ‘A’ CT - T - ‘D’ DM or ‘D’ DM - T - T -
‘A’ DM + ‘D’ CT - T - ‘A’ DM, depending on the line of use
and orientation.
To the Top of this Page
Fig. 3: District Railway Train
Formation
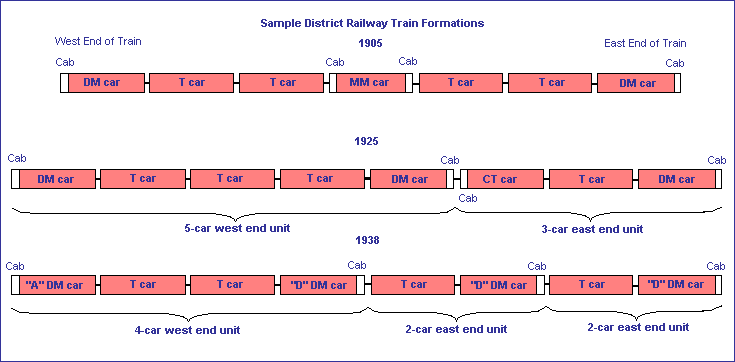
The original District Railway eletric stock formation of 1905
is shown in the uypper diagram. The middle motor car (MM) had a cab at each end and
could be used to split off a 4-car set at either end of the train. From 1908, control
trailers (CTs) were introduced so that either end of the train could run in service.
After the first world war, much of the stock was reorganised into a 5+3 formation
but eventually, this was developed into a 4+2+2 formation.
The 4+2+2 arrangement looked like this: ‘A’ DM - T
- T - ‘D’ DM + T - ‘D’ DM + T - ‘D’ DM. It was
developed in the late 1920s and survived until the early 1970s. It suffered from a
significant limitation in that there was no driving position at the west end of the 2-car
units so all uncoupling was limited in method and location as described later below.
To the Top of this Page
Fig. 4: 1938 Tube Stock Train
Formation
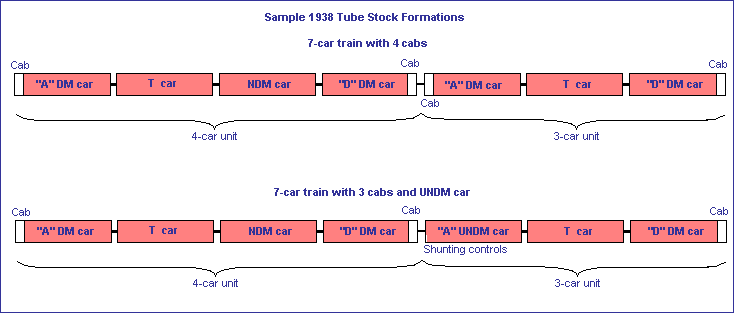
This diagram shows two versions of the 1938 Tube Stock
train formation as used between 1938 and 1988. The lower version with the UNDM was seen
regularly from the early 1950s. The 1972 Tube Stock currently on the Bakerloo has the same
formation with the "A cars facing south and the "D" cars facing north.
To the Top of this Page
Fig. 5: 1973 Tube Stock and D Stock
Train Formation
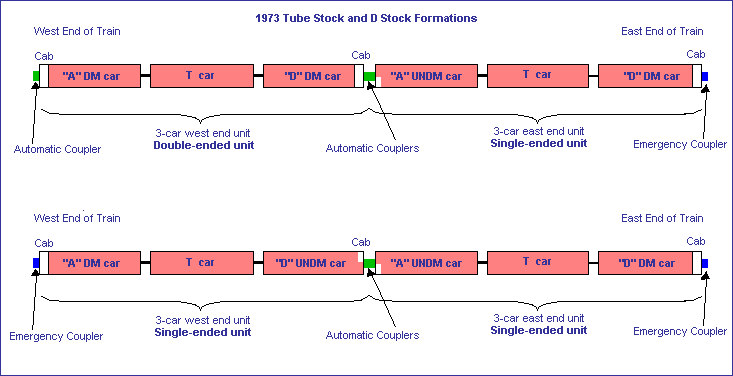
1973 Tube Stock trains were formed of single-ended 3-car
units coupled back to back to form 6-car service trains. The 3-car single-ended
units were provided with UNDMs equipped with automatic couplers and shunting control
panels. A batch of 20 double-ended 3-car sets were kept for flexibility and to allow
a unit to work the (now closed) Aldwych branch.
The D Stock, built from 1978-81 for the District Line, was
simply a surface line version of the 73TS. The main fleet was made up of
single-ended units and some double-ended units were included to provide flexibility.
To the Top of this Page
Fig. 6: 1996 Tube Stock Train
Formation
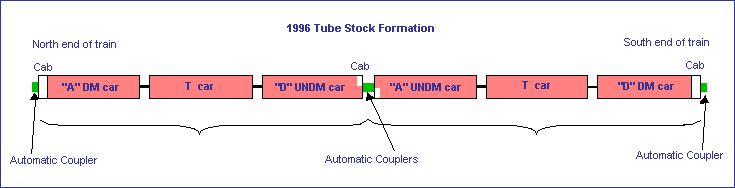
This diagram shows the 1996 Tube Stock for the Jubilee.
Both '95 and '96 stocks have the 3 + 3 formation with cabs at the outer ends
and UNDMs in the middle. There are no double-ended units.
The 1995 Tube Stock on the Northern Line is similar except
that the "universal" couplers allow "A" units to couple to other
"A" units and likewise with "D" units. The 95TS on the Northern
gets turned on the Kennington loop and therefore universal couplers are used to allow
“A” ends to couple to other “A” ends as well as “D” ends.
The 96TS doesn’t get turned and is “handed” so only “A”
ends will couple to “D” ends. Curiously, both stocks are equipped with automatic
couplers at the cabs ends.
Back to Coupling,
Handing and UNDMs page
|


