![]() End Trailer Instructions
End Trailer Instructions
|
TGVweb > TGV Models > Build Your Own > Instructions |
Serve this page from: California, USA / Pisa, Italy |
Read these important assembly instructions before starting!
Also make sure you've read the General Instructions first.
Step 1 Cut out the base of the trailer (part number 2) leaving about 5 mm (1/4 inch) margin around the edge of the part.
Step 2 Find a piece of cardboard slightly larger than the part you just cut out. A cereal box will do nicely. The cardboard will stiffen the base of the model and ensure that it is straight. Glue the part from step 1 to the cardboard. When it is dry, cut out around the edge of the part (cutting off the margin you left earlier).
Step 3 Score the main body (part number 1) along its entire length at the eight places indicated by arrows.
Step 4 Cut out the main body.
Step 5 Mark the folds on the main body. All folds are "peak" folds.
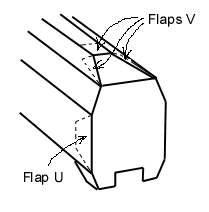
Step 6 Glue flaps V under the end of the roof, as shown in figure 1 below. Don't glue flap U just yet, we'll get to that in a moment.

Figure 1 End of the trailer showing the fit of flaps V and U.Step 7 Apply glue to the back side of flap A. Glue flap A onto the base (part 2) so that it wraps around the bottom of the base (see Figure 2 below). Make sure that the blue marks on flap A align with the blue marks on part 2, and that the green marks on flap A align with the green marks on part 2. This alignment is very important; if you don't get it right the model will be twisted or bent. Also, make sure that part 2 is oriented correctly, in the same respective orientation to part 1 as on the parts sheet.

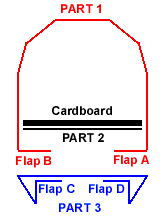
Figure 2 Cross-section of the model. This shows how the parts fit together.Step 8 Once flap A is dry, apply glue to flap B and glue it to the base (part 1) and align it using the same method as for flap A. To press on the flap you can insert a finger inside the ends of the model and press the bottom gently with your thumbs.
Step 9 Once both flaps A and B are dry, apply glue to flap U and close the end of the trailer. Use a tool like a table knife to apply pressure to the flap from the inside of the model. Make sure everything is aligned and square, otherwise your model might be twisted.
Step 10 With flap U dry, fold flap S onto part 2 and glue it down. Make sure the green alignment marks are lined up. Since it's difficult to press down on this area, use a table knife or other thin, stiff object and insert it under part 2 to apply pressure from inside the model. (Practice this before gluing!)
Step 11 Score part 3, the underbody. Score along its entire length at the six places indicated by arrows, and also score on the RED LINE at the end of the part.
Step 12 Cut out part 3. Cut along the two short diagonal lines that meet the ends of the red line.
Step 13 Mark the folds on the underbody. In the order from flap C to flap D, the first and last fold should be "valley" folds and the four others should be "peak" folds. Refer to the blue part of Figure 1 to see what a cross-section should look like. The folds on the red lines should be "valley"; the ends of part 3 fold upwards to form the ends of the body.
Step 14 Apply glue to the back side of flap C. Glue flap C onto the back side of the underbody so that you form the shape shown on the blue part of Figure 2 (seen from the end). The colored part of the underbody should slope inwards at an angle of about 45 degrees.
Step 15 Repeat the last step for flap D.
Step 16 Apply glue to the top of the underbody (the rectangular area labeled "door at this end") and glue it to the underside of the main body. The underbody should cover flaps A and B and should be glued in the correct orientation, with the end labeled "door at this end" on the end of the body with the doors. Make sure the underbody is centered, both lengthwise and crosswise. This operation is the most difficult step in building your model, so go slowly and carefully.
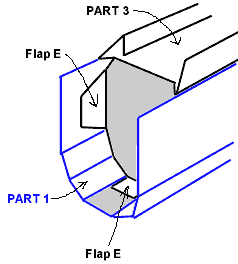
Step 17 Fold the end of the underbody upwards into the body until it is vertical. Flaps E (three of them) should be glued to the inside of the body as shown in Figure 3 below. Make sure the end wall remains vertical while you glue flaps E.

Figure 3 Duplex trailer end detail after assemblyStep 18 Score part 4, the wheels, according to the arrows. The two small white square flaps H should also be scored.
Step 19 Cut out part 4 and fold it. All folds are "peak" folds.
Step 20 Fold the bottom flaps (unlabeled) to the back of the wheels. These flaps are not glued to anything and are used only to provide stiffness.
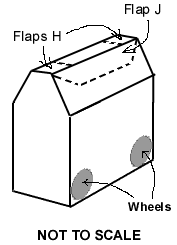
Step 21 Glue flap G so that part 4 forms a box. Apply glue to flap J and glue the top of the wheel assembly together, folding flaps H under the top of the assembly. (If you want, you don't have to put glue on flaps H). See Figure 4 for how the result should look.

Figure 4 Part 4 after assemblyStep 22 Glue the completed part 4 onto the open end of the body. The end of the wheel box should touch the vertical wall inside the trailer body (see Figure 5) and the top of the wheel box should touch the inside of the trailer roof; apply glue to the areas shaded in gray in Figure 3. Make sure everything is centered and square before the glue dries.

Figure 5 Part 4 after gluing to bodyStep 23 Score part 5, the wheels, according to the arrows. Also score on the red lines beneath flaps Q.
Step 24 Cut out part 5 and fold it. All folds are "peak" folds. Fold the bottom flaps (unlabeled) to the back of the wheels. These flaps are not glued to anything and are used only for stiffness.
Step 25 Glue flap P so that part 5 forms a box. Fold flaps Q inward, and glue the wheelset in its place under the end of the trailer. Make sure everything is centered and square as the glue dries.
This completes the assembly of the TGV Duplex end trailer. When you put together several trailers, it is recommended to glue them in a manner similar to that described in Step 22.
You can now return to the model page.
Last update: May 2000
|
TGVweb > TGV Models > Build Your Own > Instructions |