TrainWeb.org Facebook Page
B&O Photo Tour


B&O Baltimore Belt Line
Modern day photo tour

Accompanying each photo below are:

Click a photo to see a larger view. Please send your comments and corrections to Steve.


<< Previous (west) | THIS PAGE: Jones Falls | Next (east) >>

Rebel Yell

Rebel Yell
Mile: BAK 94.4 Date: Sep 2016
Ease: B View: NW
Area: C RBL:
Map: Ba 35 A 10 Topographic Maps

We resume following the B&O Belt Line out of downtown Baltimore, where just north of the Howard Street Tunnel the city's light rail puts on a show.

Beyond its Mount Royal stop, light rail bifurcates into a spur box top (foreground with train) serving Penn Station (off photo-right) and a much longer line that generally follows to Hunt Valley, Maryland what had been the Northern Central Railway's (NCRY's) route into Pennsylvania.

The latter must dip, rise and twist to negotiate a maze of obstacles, a section dubbed the Rebel Yell after a regional theme park's roller coaster. Dual tracks here slide under the Howard Street bridge before encountering a "lift hill" over B&O's Belt Line, as seen in the zoom at right.

Link: Sun report


The Box

The Box
Mile: 94.3 Date: Sep 2016
Ease: B View: NW
Area: C RBL:
Map: Ba 35 A 10 Topographic Maps

There's no ornate bridge for the Rebel Yell, just this utilitarian box of graffiti collage concrete over the Belt Line that the light rail attacks diagonally.

This and other tour photos have been edited to digitally scour this area's endemic migraine-aura-like graffiti, and for shadow reduction.

Link: more pics (link not browser-friendly)


Train Garden

Train Garden
Mile: 94.3 Date: Sep 2016
Ease: B View: NE
Area: C RBL:
Map: Ba 35 A 10 Topographic Maps

Though the adjacent art school had no influence on the design of The Box, students did install this attractive garden where trains begin their descent. That's the JFX, I-83, behind.

Links: art park 1, art park 2


Camelback

Camelback
Mile: 94.3 Date: Apr 2000
Ease: B View: SE
Area: C RBL:
Map: Ba 35 A 9 Topographic Maps

Passengers to Hunt Valley are no doubt raising their arms and screaming by now. Though the grade exceeds the manufacturer's specifications for these light rail units, it has proved manageable.

Link: 1959


Headchopper

Headchopper
Mile: 94.3 Date: Apr 2000
Ease: B View: N
Area: C RBL:
Map: Ba 35 A 9 Topographic Maps

As the operator pulls hard on the train's steering wheel (not really), passengers inside duck to squeeze under the JFX, purportedly with just 1 inch to spare. There is no truth the rumor Baltimore is considering adding a Raven Turn here.

In the distance note, the set of four "tunnels" under North Avenue since they will appear in several tour photos below. Light rail inherited the two on the left from Northern Central while the CSX received the two on the right from B&O. A CSX maintenance of way train is working the rightmost.

Link: Raven Turn illustration


Articulated Gondolas

Articulated Gondolas
Mile: 94.3 Date: Apr 2000
Ease: B View: N
Area: C RBL: 89
Map: Ba 35 A 9 Topographic Maps

The ends of these gondola cars have been removed to create one long, articulated car.

This MoW train is being pulled and pushed by ex-B&O GP40-model unit number 4059 born October 1971. CSX repainted it into this pumpkin livery, renumbered it 9718, then during 2008 rebuilt it into Road Slug number 2372.

Links: B&O 4059 pics, CSX 9718 pics


1917 Aerial
Photo credit Detroit Publishing Company,
via Shorpy

1917 Aerial
Mile: Date: 1917
Ease: View: NW
Area: RBL:
Map: Ba 35 B 10 Topographic Maps

In this view dating from 1917, you'll find the same four "tunnels" near top center where B&O's NA Tower once ruled. This wonderful photo captures railroading flourishing in the Jones Falls valley with no fewer than five companies represented, some of which by this time were under control of the powerful Pennsylvania Railroad. That autos outnumber horse-drawn carriages hints that change is brewing.

panorama north These modern panoramas of a century later, though poorly stitched together and snapped from a different spot (over what had been Bolton Freight Yards), illustrate differences wrought by time.

Two large highways did not exist in 1917: the JFX was built over the Jones Falls, and the double-arched Howard Street spans that stream. The 1917 photo looks this direction from near the tall building at the right edge of the east-facing panorama. panorama east

Links: source DPC photo, similar 1952?


NA Tower (Site)

NA Tower (Site)
Mile: 94.2 Date: Sep 2016
Ease: B- View: NW
Area: C- RBL: 89, 149
Map: Ba 35 A 9 Topographic Maps

Before proceeding under North Avenue (ahead), tracks of the Northern Central and B&O met coldly here in a diamond, up to eight of them to be exact. Into the 1980s, B&O's NA Tower oversaw the action from a spot near the center of this photo. That's the JFX casting shadows from the left.

NA Tower was one of only three B&O towers in the region that employed an electropneumatic switch system, rather than armstrong levers, and the only one that used air pressure supplied by the Pennsylvania Railroad, parent of Northern Central. The other B&O towers that employed air pressure to operate track switches were Riverside and WB Tower in Brunswick, Maryland. Instead of armstrong levers, the interior photo linked below shows NA's US&S model A5 switch machine.

Links: NA Tower 1980s photo, 1985, interior

Change for: NC tour at this site


1974 Aerial
Photo courtesy Library of Congress

1974 Aerial
Mile: Date: 1974
Ease: View: NW
Area: RBL:
Map: Ba 35 A 9 Topographic Maps

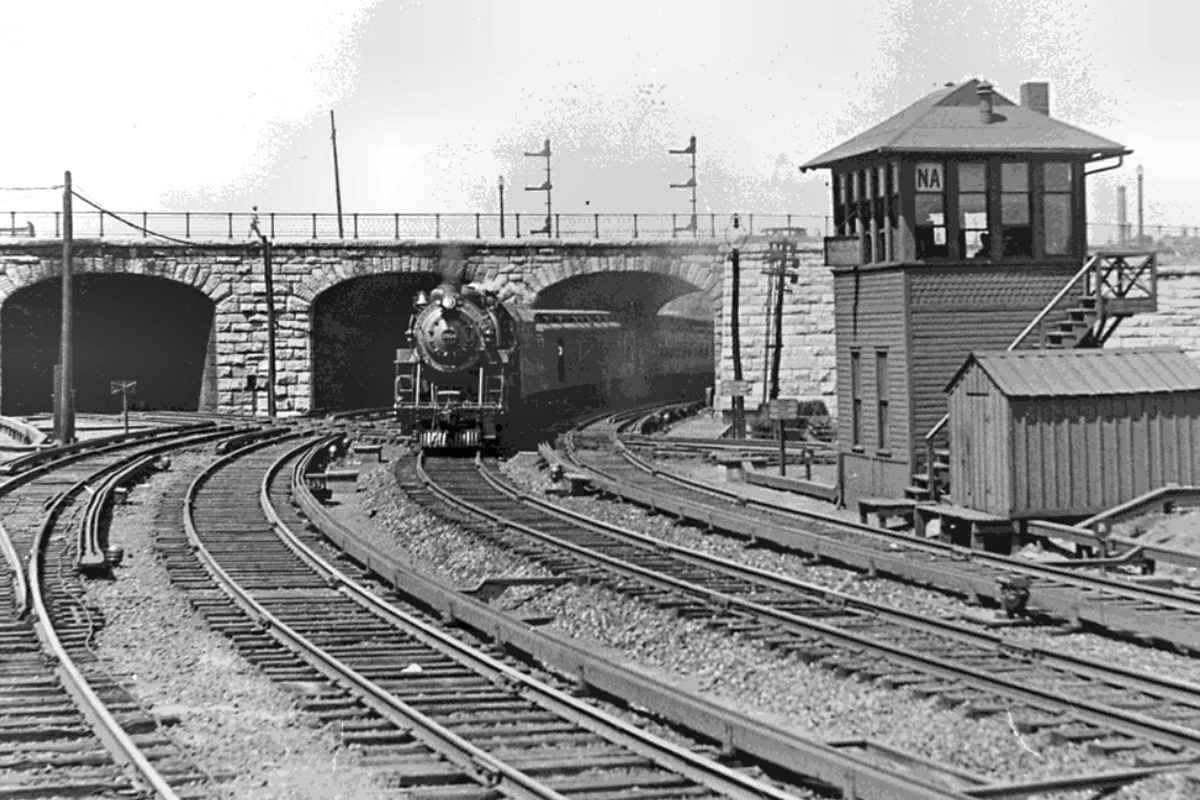
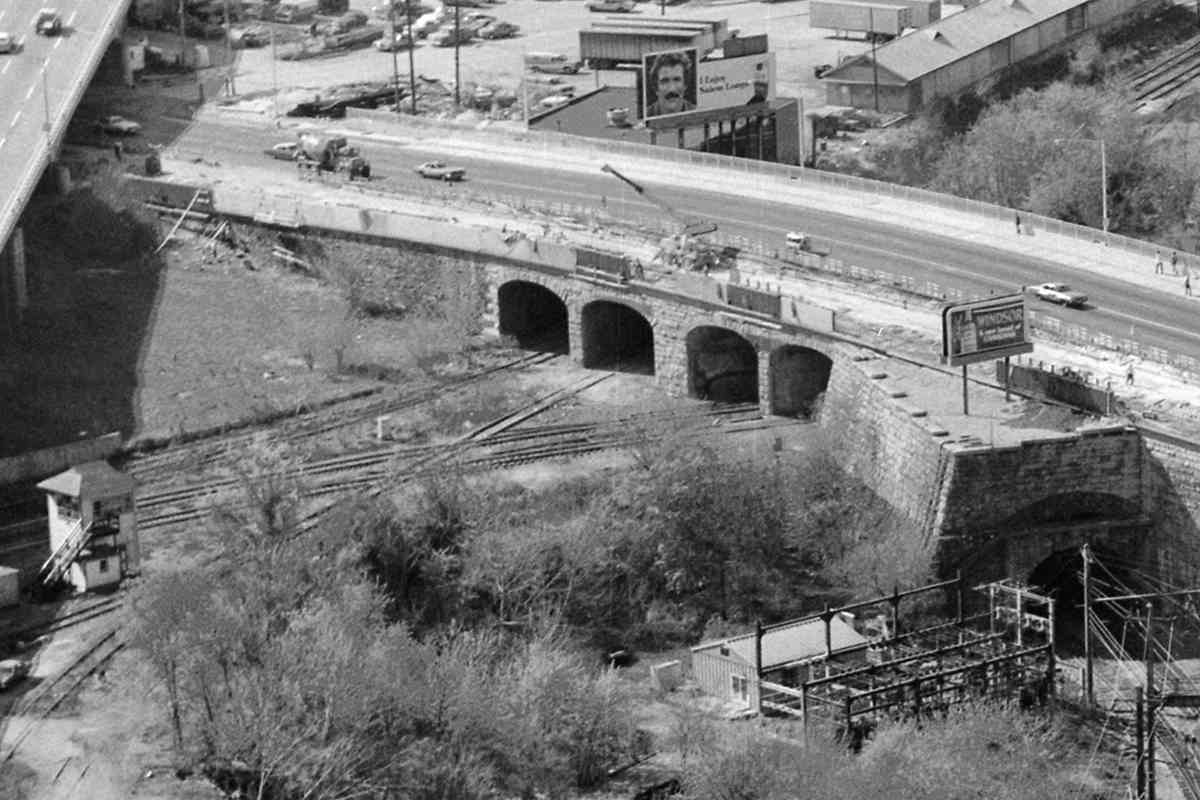
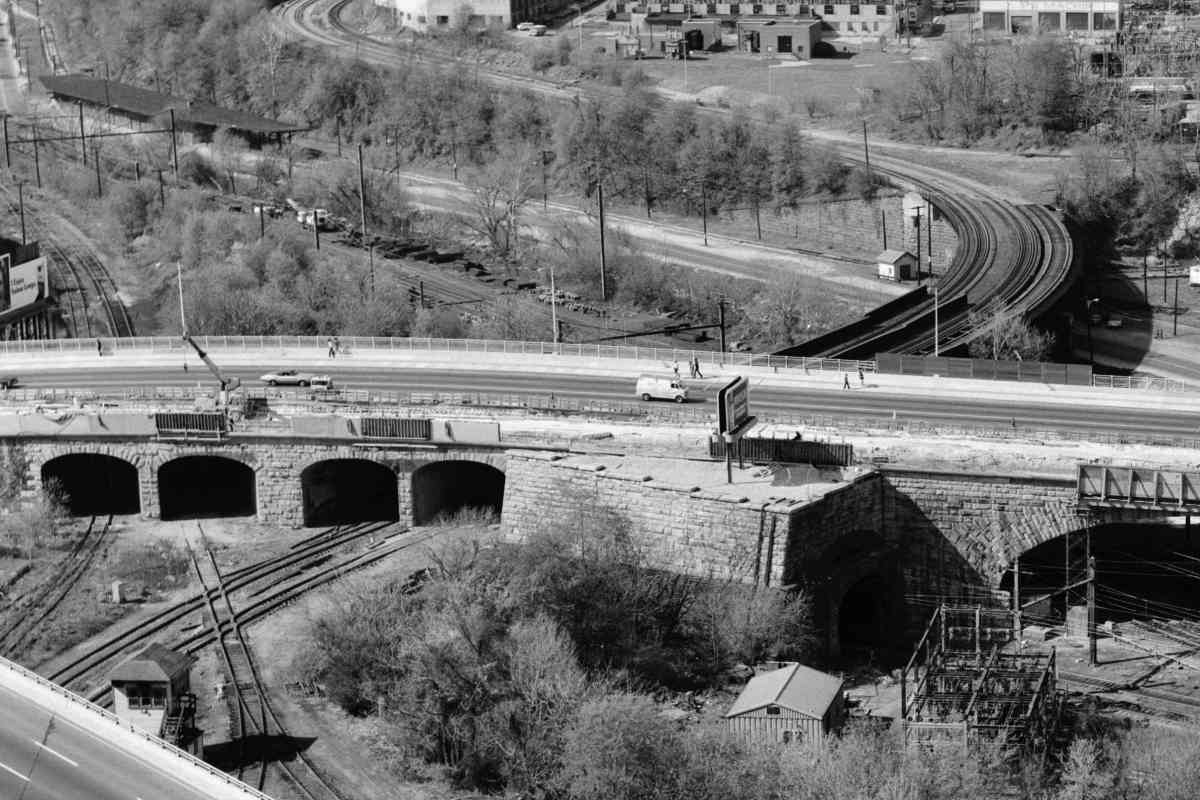
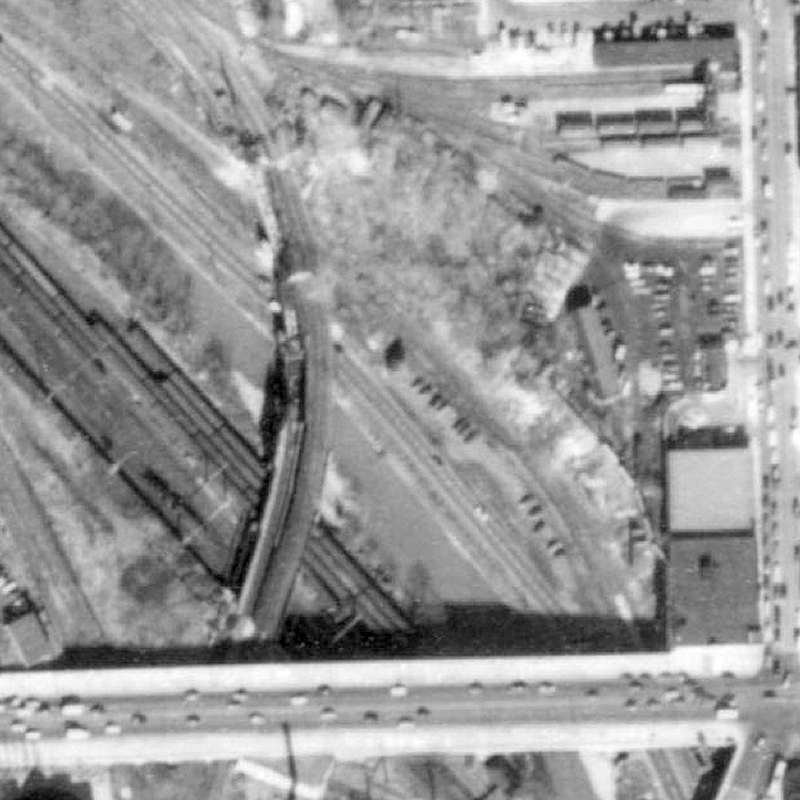
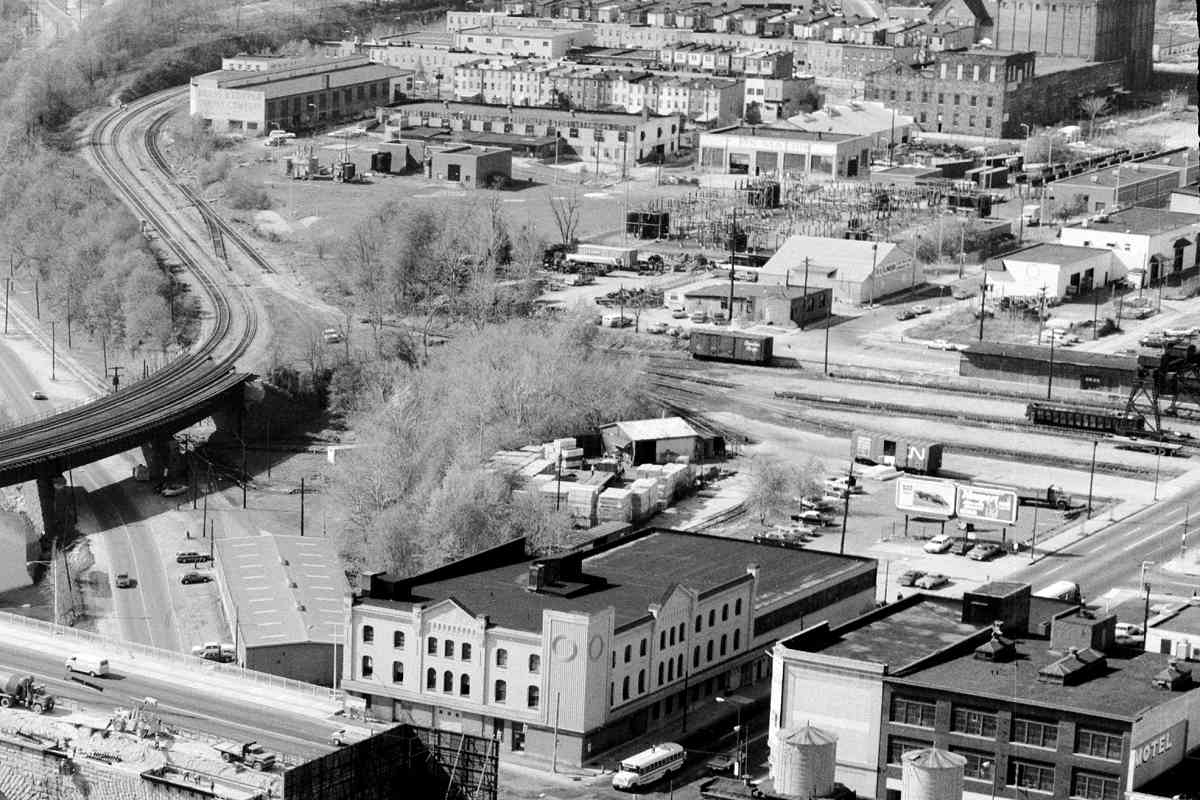
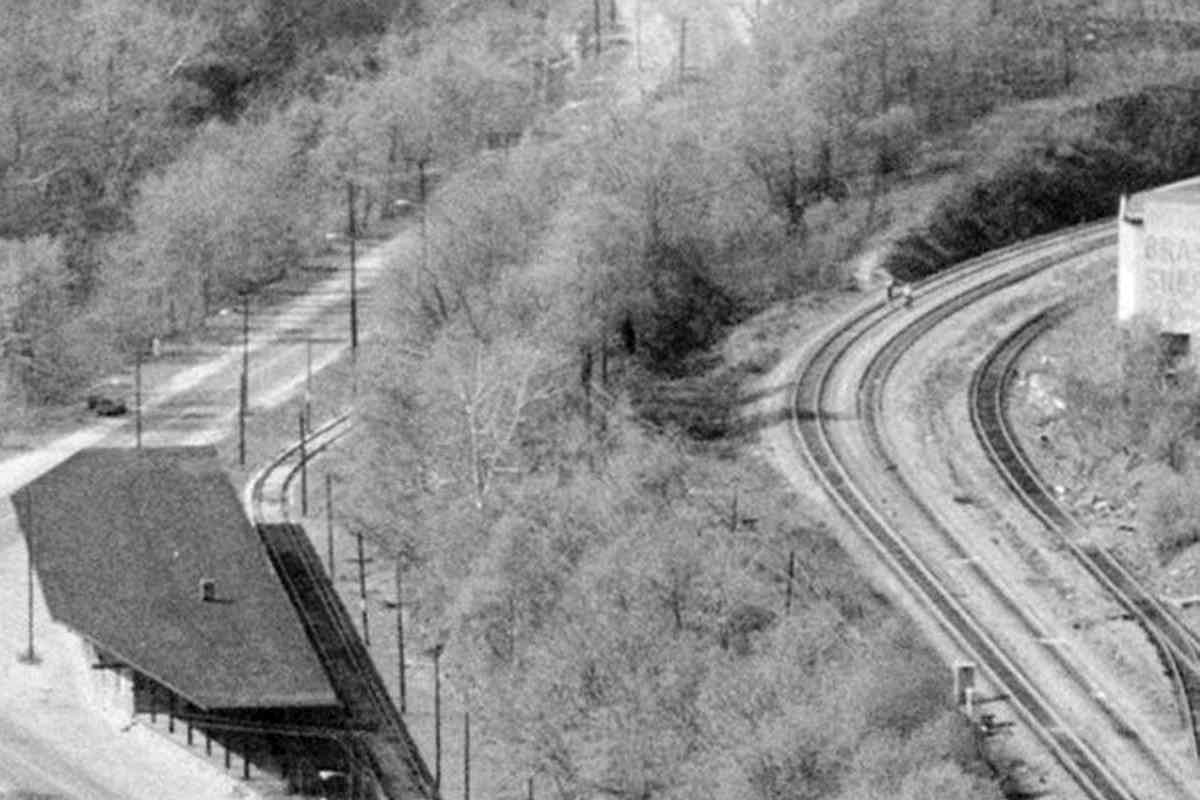
The JFX has been on the left since about 1960 and NA Tower was still in use in 1974, while at top a pre-Magnum Tom Selleck hawks cigs.

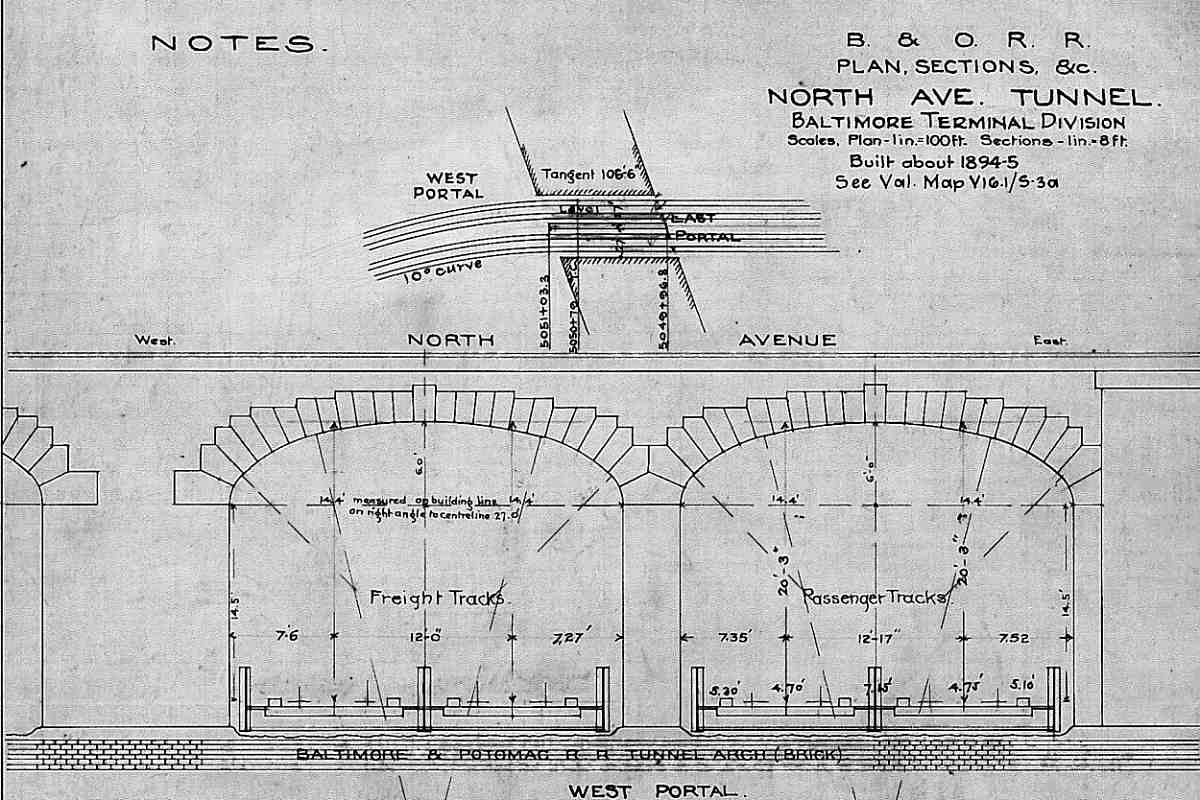
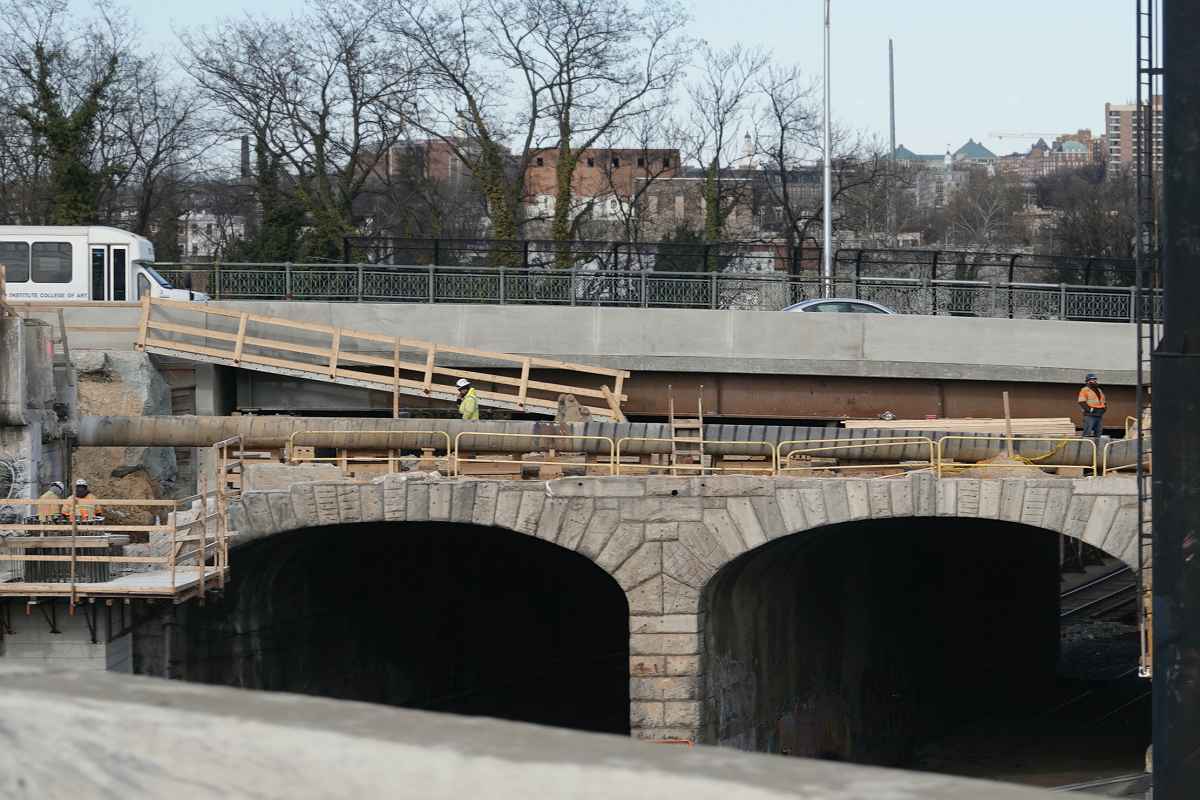
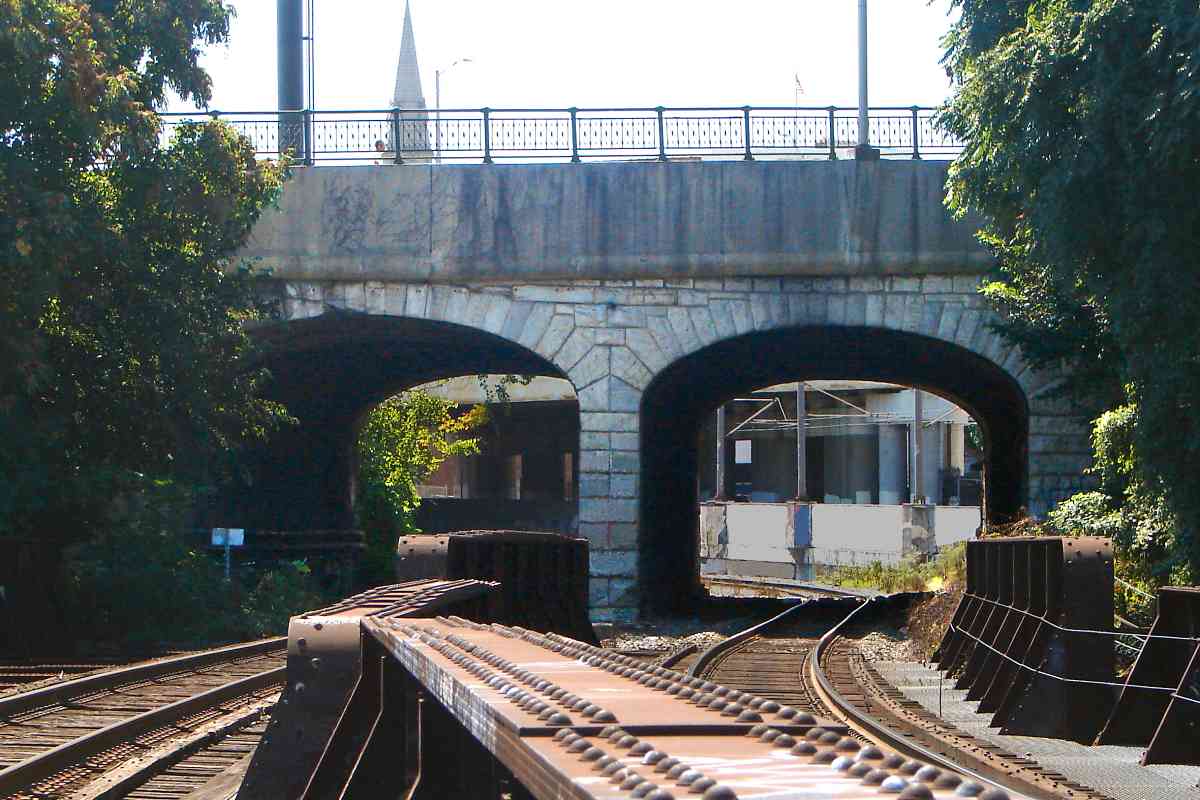
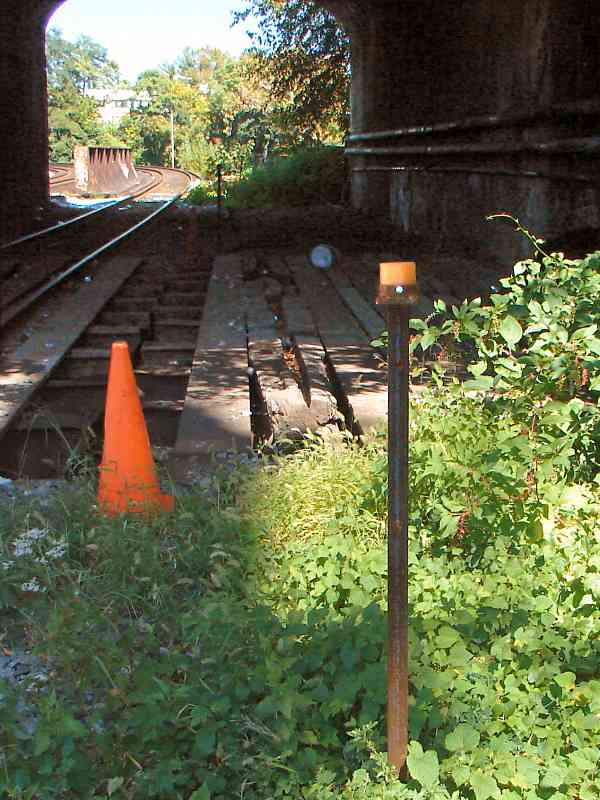
On the right, the thumb protruding from North Avenue marks the north portal of the West Baltimore tunnel opened by Baltimore & Potomac (B&P) Railroad during 1873. B&P Tunnel has three sections -- this one named for nearby John Street -- all of which were inherited by Pennsylvania Railroad and are 
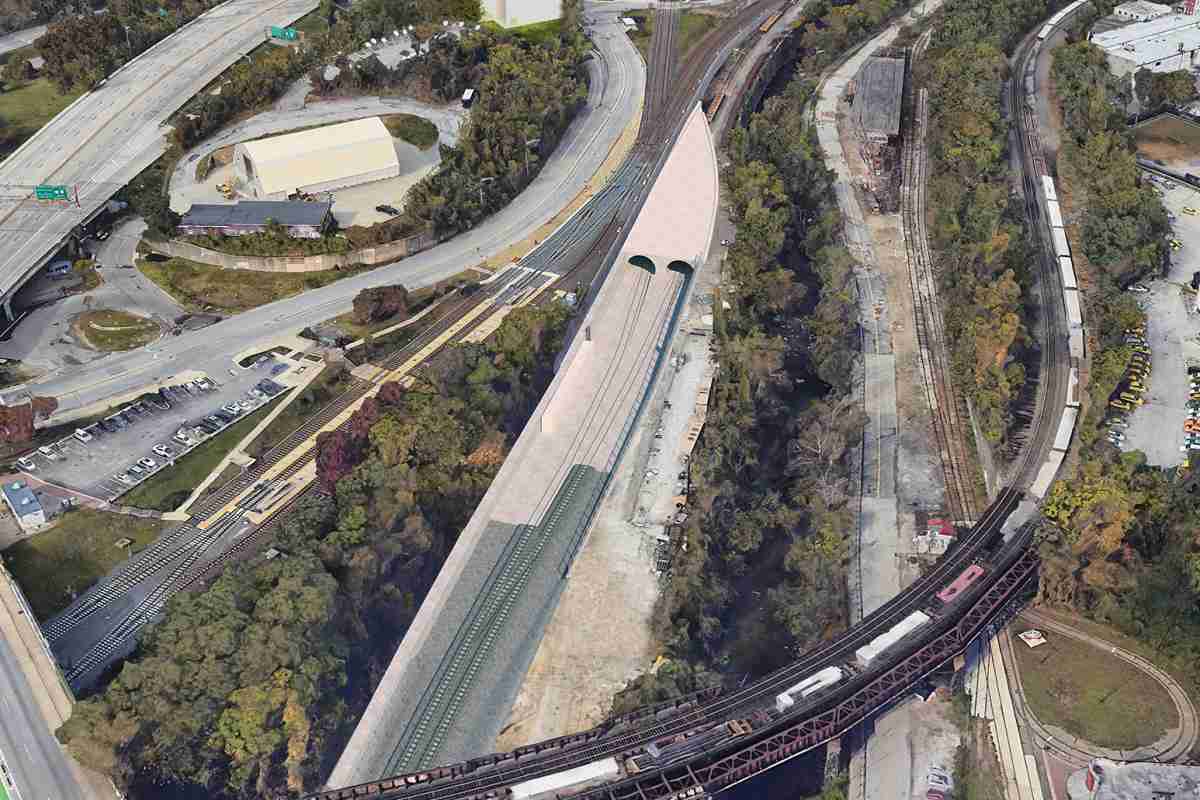
now part of Amtrak's Northeast Corridor. A train rumbles through every 10 minutes on average, most of which are Amtrak and MARC passenger trains, plus a few Norfolk Southern freights. The old tunnel has become an operational bottleneck due to limiting height, curves, and grade.

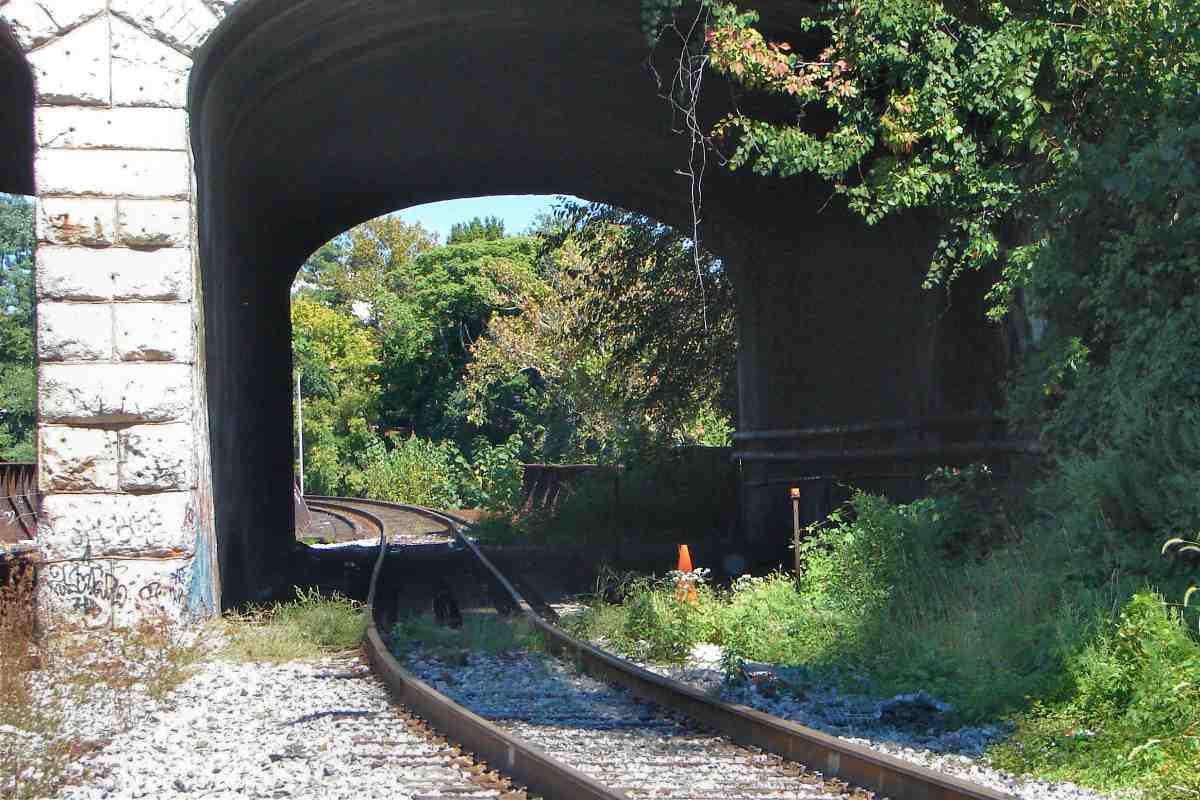
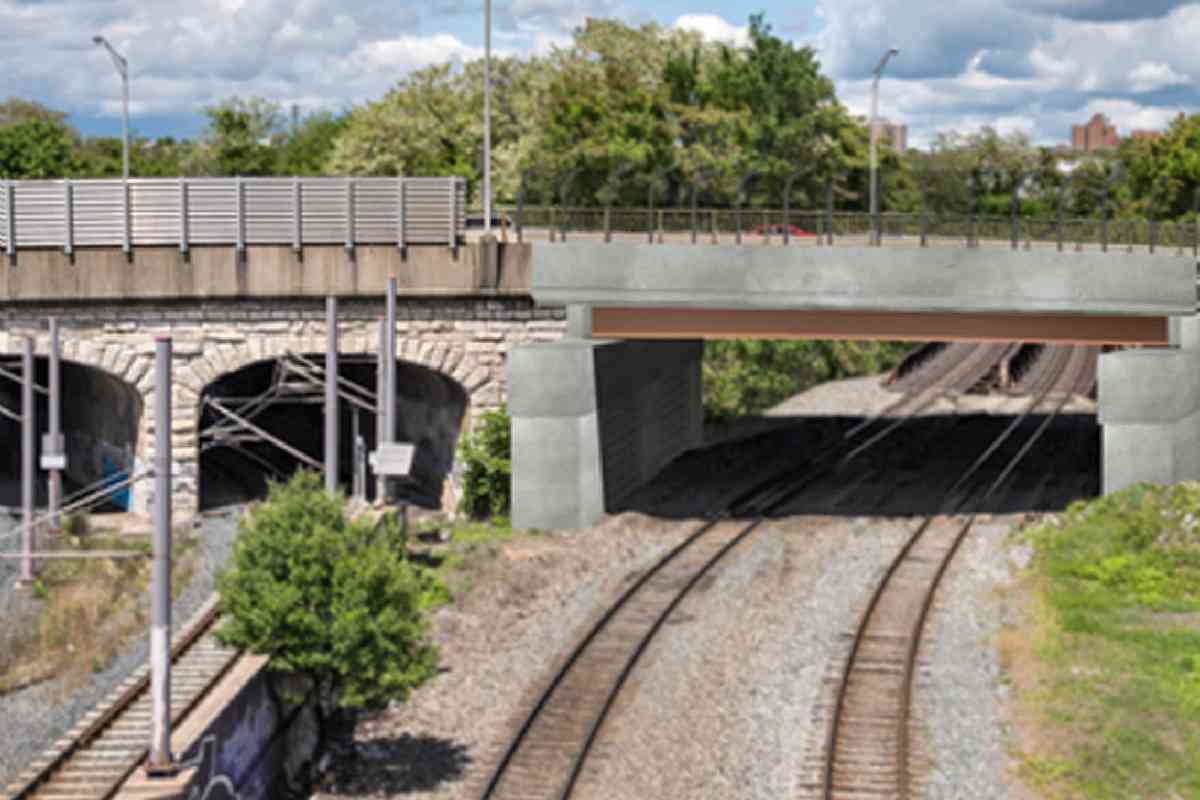
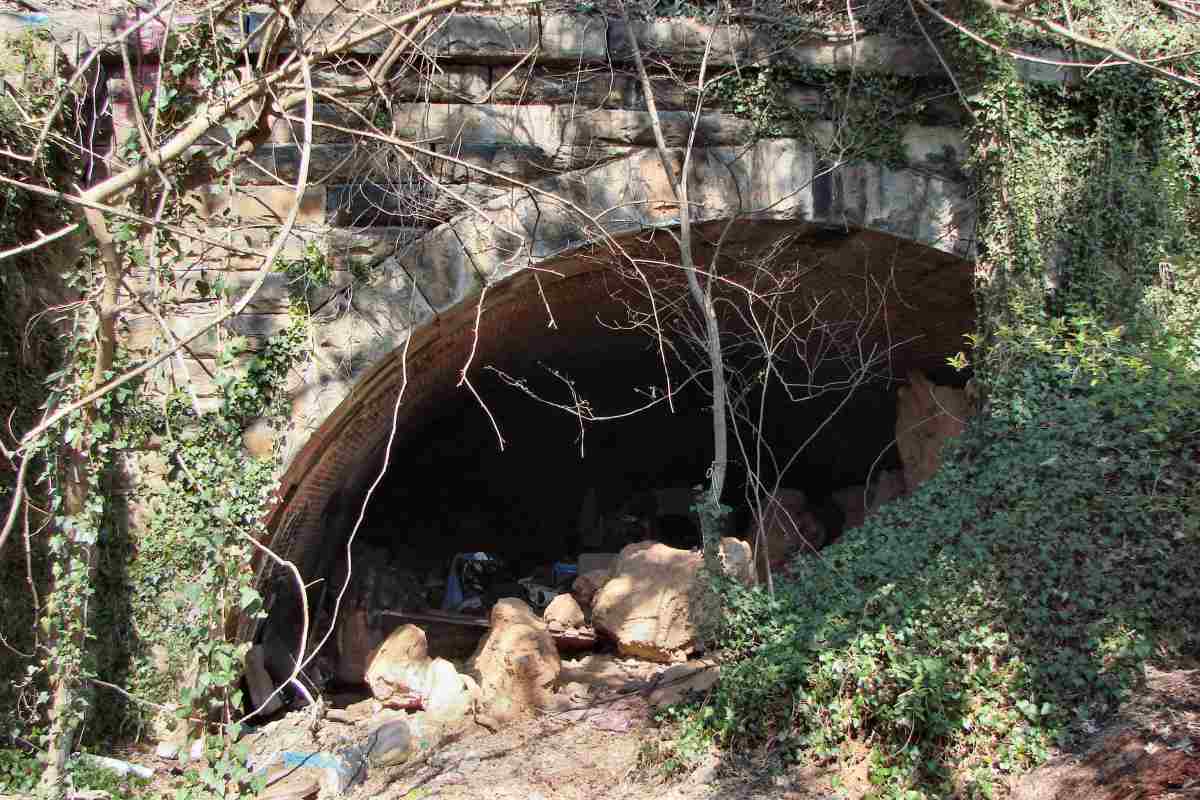
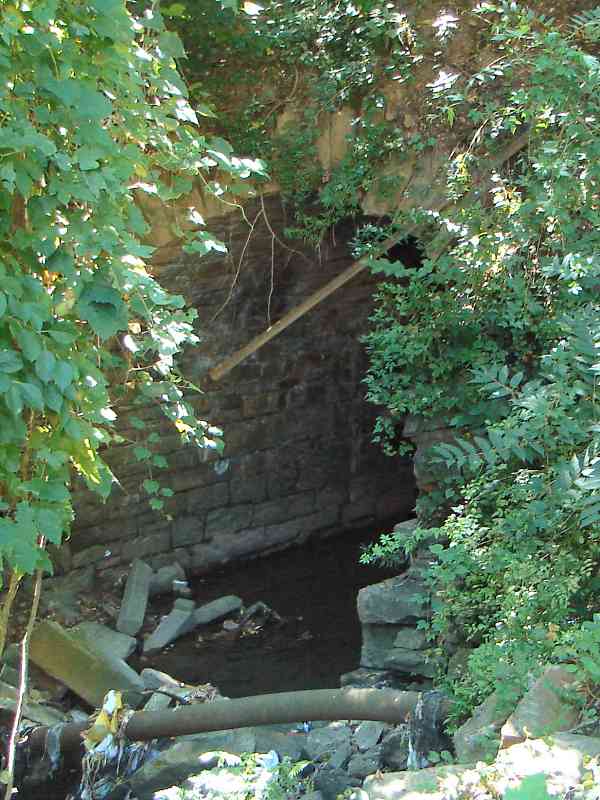
If you look closely at the thumb, you'll see a smaller stone arch is contained within a larger one. The smaller is the actual B&P tunnel while the larger arch redirects the weight of North Avenue around it.

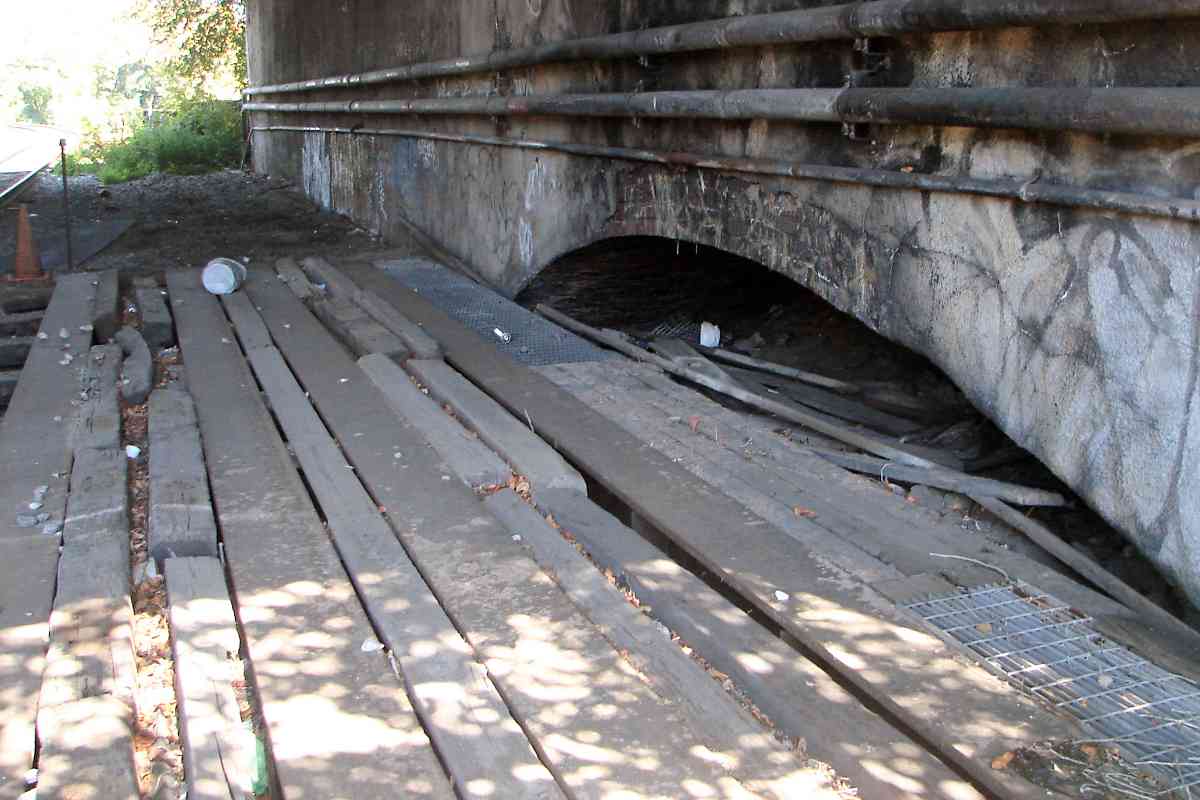
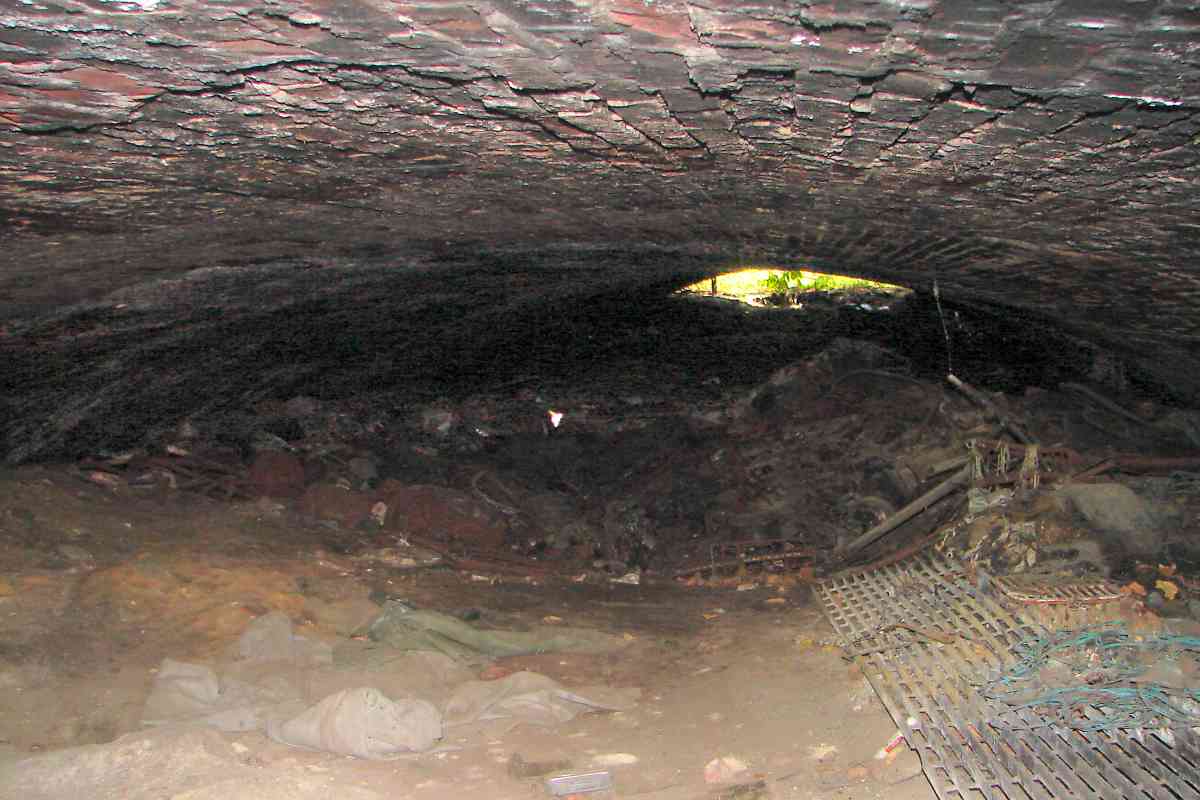
Like the other railroads, B&P / Pennsy received two tunnels under North Avenue. The other is now at photo top, its never-completed eastern portal buried by JFX construction not far from the Selleck billboard, incomplete so long it is all but forgotten; you will find no other mention of it online.

Link: LoC source photo


North Avenue

North Avenue
Mile: 94.2 Date: Sep 2016
Ease: B- View: N
Area: C- RBL:
Map: Ba 35 A 9 Topographic Maps

marker B&O's Belt Line is sandwiched between North Avenue above and one of the two B&P Tunnels that traverse under. Though Northern Centrail arrived here first -- a precedence inherited and now enjoyed by light rail -- the B&P Tunnels are the oldest remaining structures (1873), following by the the Belt Line and North Avenue built concurrently during the 1890s.

This uncommon orange-topped pole flags the unusual situation that lies in the shadows ahead...


Bridge Under Bridge

Bridge Under Bridge
Mile: 94.2 Date: Sep 2016
Ease: B- View: NE
Area: C- RBL:
Map: Ba 35 A 9 Topographic Maps

Under the North Avenue bridge, between the wood planks are steel beams of a B&O bridge over the B&P Tunnel (!). The tunnel was deemed too weak to support trains so closely above it, hence the need for a bridge across it. On the right, once again North Avenue arches over the tunnel so as to not press upon it.

Nowhere are the train height limitations of B&P Tunnel and the Belt Line as focused as this. B&P Tunnel's roofline can't be raised because the Belt Line is immediately above. The Belt Line's floor can't be lowered because the B&P Tunnel is immediately below. The Belt Line's roof can't be raised without modifying North Avenue above. Solving the height limitation will be expensive here.

Links: Federal Railroad Administration report, B&P Tunnel project


Arch Over Arch

Arch Over Arch
Mile: 94.2 Date: Sep 2016
Ease: B- View: SE
Area: C- RBL:
Map: Ba 35 A 9 Topographic Maps

You know you want to see what is between the B&P arch below and North creek Avenue arch above.

The answer is not a whole lot. With this arrangement, the lower arch is not actually needed. Its removal might create much-needed additional height for Norfolk Southern freight trains, at least for a brief distance.

Few are aware this is almost a triple arch stack: arch over arch over arch. Hidden below the B&P Tunnel is a stone arch (right) for the Butter's Run creek that flows into Jones Falls. This arch might pre-date North Avenue, having been built to carry B&P over the creek.


North Portal

North Portal
Mile: Date: Sep 2016
Ease: A- View: W
Area: C- RBL:
Map: Ba 35 A 9 Topographic Maps

Many drive on North Avenue's bridge across the Jones Falls and never know its sidewalk offers the easiest clear view of a still-active B&P Tunnel portal. Nearby signage describes this as the "John St. Tunnel North Portal".

Link: Todd's B&P Tunnel page

Change for: B&P / PRR tour at this site


Jones Falls Bridge

Jones Falls Bridge
Mile: 94.2 Date: Sep 2016
Ease: B- View: N
Area: C- RBL: 144
Map: Ba 35 A 9 Topographic Maps

After North Avenue, the Belt Line crosses the Jones Falls via this bridge on a curve that in the past was quadruple-tracked. The concrete base previously supported a CPL signal that had replaced a semaphore signal bridge.

Link: 2013


Electric Motors
Photo © 2005 St. Louis Mercantile Library at the University of Missouri St. Louis

Electric Motors
Mile: 94.2 Date: ~1920
Ease: B View: NW
Area: C- RBL: 93
Map: Ba 35 A 9 Topographic Maps

One of North Avenue's arches does span actual water. On the bridge beyond, note B&O's electric motors that had pulled trains through the Howard Street Tunnel. The motors escorted most trains a mile or two beyond the tunnel's east portal.

Links: same spot 1967, Ma & Pa photos


Back to North Avenue

Back to North Avenue
Mile: 94.2 Date: Sep 2016
Ease: B- View: S
Area: C- RBL:
Map: Ba 35 A 9 Topographic Maps

Deep zoom across the Jones Falls valley brings this reverse view back to North Avenue.

Link: ~1940 showing semaphore signal bridge at bottom


Streetcar Museum
Photo courtesy Dave Hiteshew

Streetcar Museum
Mile: 94.1 Date: Mar 2008
Ease: A- View: SE
Area: C RBL:
Map: Ba 35 A 9 Topographic Maps

Where the Belt Line bridge over the Jones Falls valley returns to land, it finds the Baltimore Streetcar Museum (BSM), here exercising their number 7407 built by the Pullman-Standard Car Manufacturing Company during 1944 for the Baltimore Transit Company. BSM's track gauge of 5 feet 4.5 inches is wider than standard, replicating that required by city law to permit 19th century private wagons to share the rails.

Links: Baltimore Streetcar Museum, Todd's Guide to the BSM, Derailment 15 Mar 2019


Milepost 94
Photo courtesy Dave Hiteshew

Milepost 94
Mile: 94.0 Date: Sep 2009
Ease: B View: NW
Area: C- RBL:
Map: Ba 35 A 9 Topographic Maps

After heading mostly north from Camden Station, the Belt Line in the 1890s finally reached a then-lesser-developed area of Baltimore City where land was less expensive. The Belt Line could finally turn east here. The cities of Philadelphia and New York are more east than north of Baltimore.

To my knowledge, number 94 is CSX's highest posted mile along the ex-B&O Belt Line. It measures from B&O's passenger station at 24th and Chestnut in Philadelphia.

The extra width on the right originates with a siding that led into a small yard along Howard Street known as Coalmen's Row.


Coalmen's Row
Photo courtesy Library of Congress

Coalmen's Row
Mile: Date: 1974
Ease: View: NW
Area: RBL:
Map: Ba 35 A 9 Topographic Maps

In this 1974 view, milepost 94 hugs the closer curve at left, while North Avenue and Howard Street (fomerly Oak Street) intersect at bottom. At photo center, the small yard known as Coalmen's Row saw railroad use into the 1980s before conversion into commercial / industrial property. There are no RR artifacts within. interconnect

Various stone quarries on the left had carved into the valley hillside, one of which was owned by stonecutter Hugh Sisson for which a nearby street is named. This zoom of the top left shows what B&O called Oak Street Junction, the dark area near the center where steep track had interconnected the Belt Line and Maryland & Pennsylvania Railroad. That's an ex-Ma & Pa maintenance shed at left along Falls Road.

Link: LoC source photo


Glen Edwards Avenue

Glen Edwards Avenue
Mile: 93.9 Date: Mar 2020
Ease: A- View: NE
Area: C- RBL:
Map: Ba 35 A 9 Topographic Maps

Known of by few is B&O's brick-lined, stone arch bridge for Glen Edwards Avenue. Before its northeast end was plugged circa 1950, it connected what is now Hampden Avenue with Falls Road. The open end served as an unofficial homeless shelter at photo time.


Interconnect

Interconnect
Mile: 93.8 Date: Nov 2016
Ease: B- View: NW
Area: D+ RBL:
Map: Ba 35 A 9 Topographic Maps

Ma & Pa's operation in Maryland shuttered during 1958, and with it this connection now occupied by homeless. An individual has had designs on reactivating this route, but others are not taking the project seriously (link below).

Link: the new Northern Central


<< Previous (west) | THIS PAGE: Jones Falls | Next (east) >>

Or, return to main page

Copyright Notice