This is the 2010 diary of the S&TR
Dec 29, 2010 I've been playing with MS Photo Story program which takes a sequence of still pics and makes a 'video' of them. It's very easy to use. But this one is just a panorama of pics 'stiched' together.
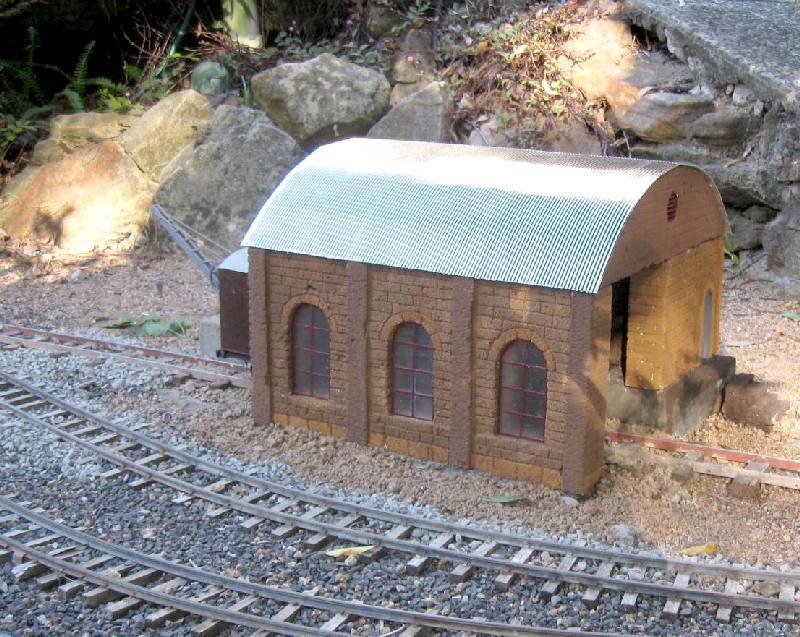
But I think it looks better at Melaleuca as shown below. It fits where the goods shed used to be.
++++++++++++++++++++++++++++++++++++++++++++++++++++++++++++++++++++++++++++++++++
+++++++++++++++++++++++++++++++++++++++++++++++++++++++++++++++++++++++++++++++++++
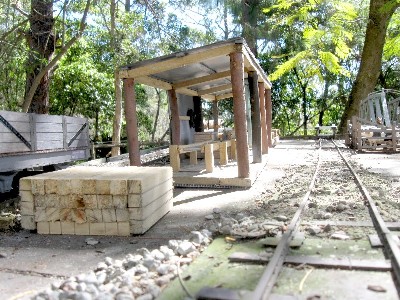
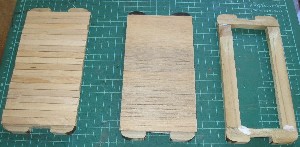
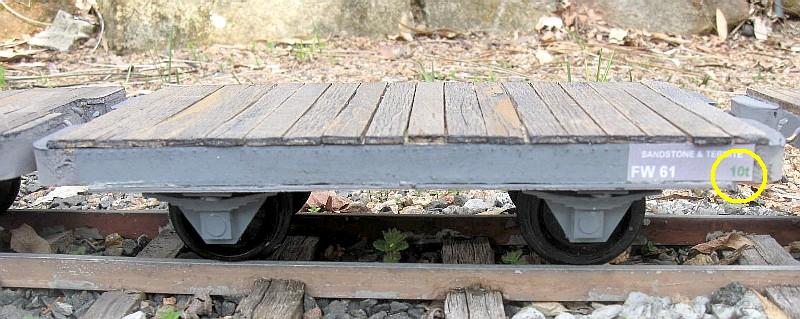
The floors are paddle pop sticks, finished with black boot polish. Note that my wagon numbers now include a weight - see yellow circle. (Soon I'll be 'rating' all my locos to pull certain tonnages and each wagon will have a mass shown. More on this later.......)
++++++++++++++++++++++++++++++++++++++++++++++++++++++++++
Here’s the process for making bricks!......
We also carried 100' of plastic rail, in 5' lengths, in our suitcases. (We were staying only 1/2 hr drive from Train-Li-USA in Massachussets,
so I couldn't miss the opportunity.)
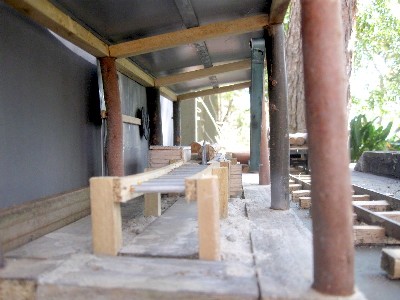
The back platform is just 400mm long.
The automatic reverse loop turnout controller at Lilyvale had failed (again - this time due to my overloading the LED current). So I decided to put the electronics in a small airtight, plastic food container. and then had to rebuild the 'shed' that covers to whole thing. Hopefully that will keep the moisture and ants out.
Back Front
Took delivery of a Hartland Mack loco yesterday. Bryan got one too (his is green)
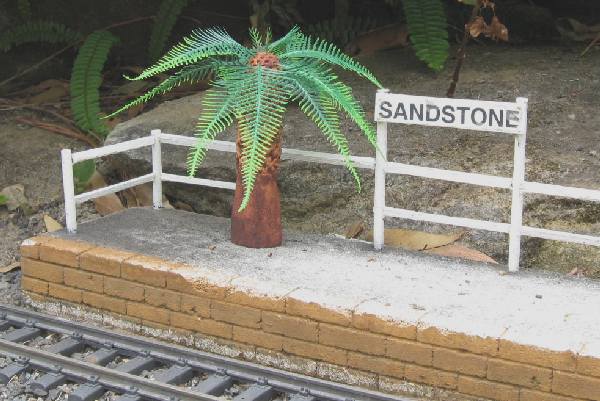
Geof's Queensland train runs through Sandstone, while SaTR's #14 labours uphill far above.
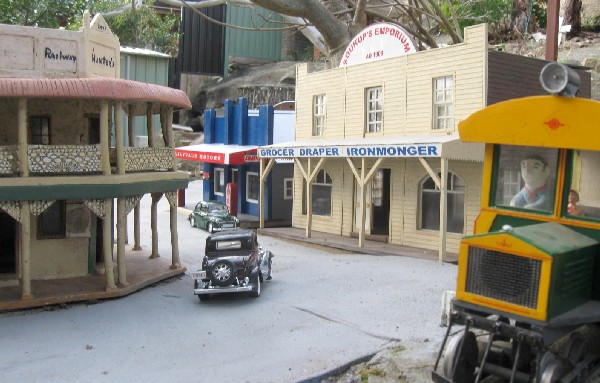
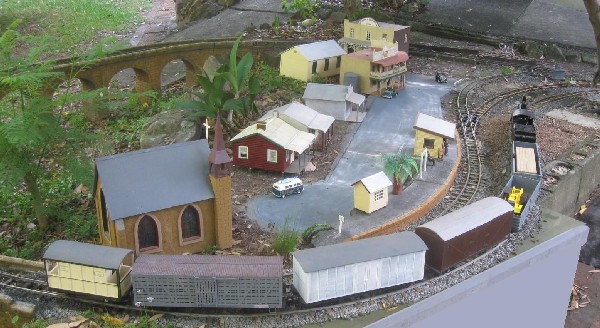
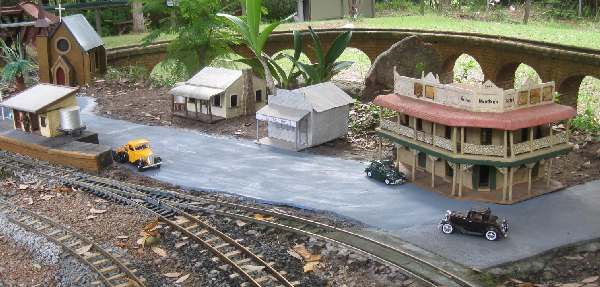
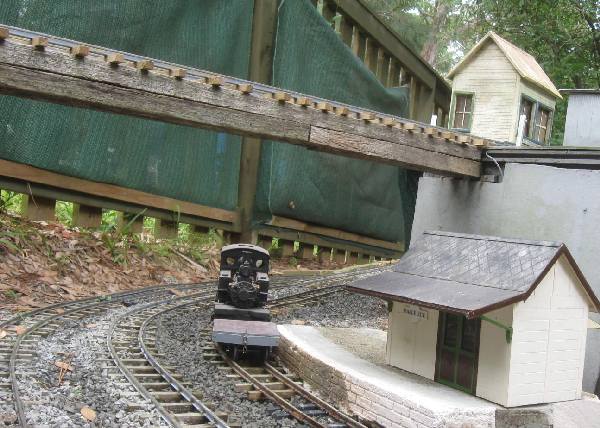
Lilyvale town is starting to develop nicely. A station, wide main street with a church, pub, emporium, butchers shop, hall and 2 houses so far.
+++++++++++++++++++++++++++++++++++++++++++++++++++++++++++++++++++++++++++++
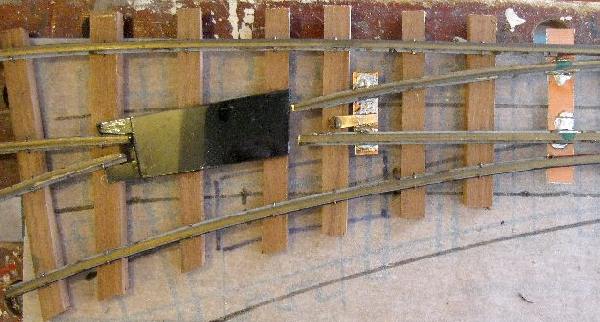
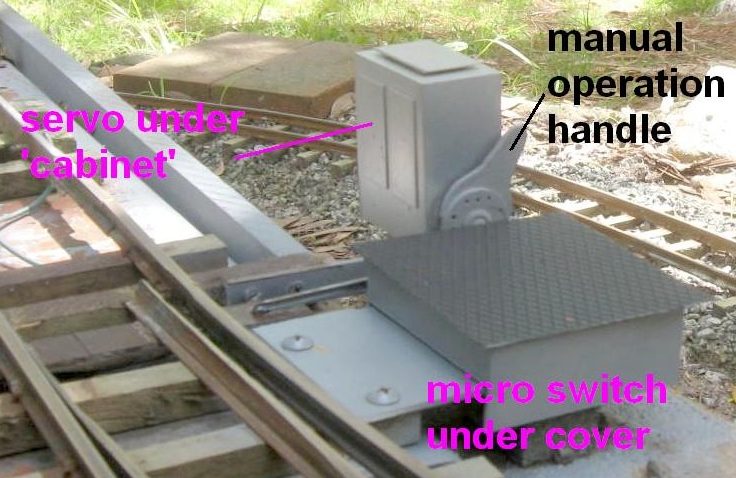
I've motorised the turnout over behind Melaleuca using a servo motor.
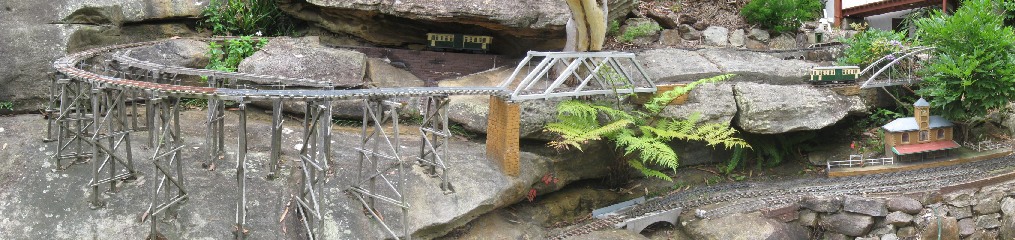
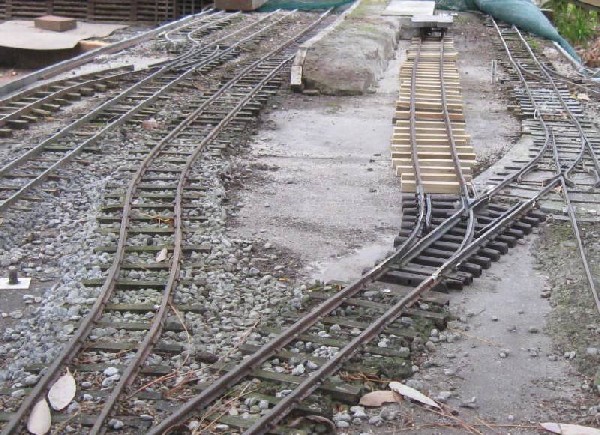
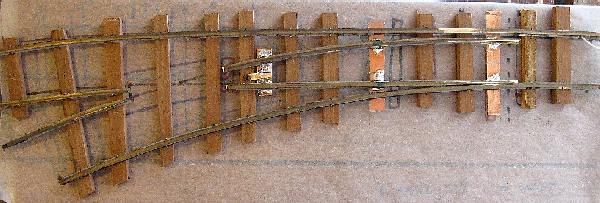
This is the track layout now.
To reverse, I used my now standard micro servo with a SPST switch superglued to the side. The switch just operates the existing reversing relay.
The left ones are just what I needed to make a palm tree (Pauline had made me the trunk from clay years ago). I really need a 2nd packet, but naturally they only had one in stock. The others will become shrubs on platforms.
click here for 2004-06 diary
click here for 2007 diary
click here for 2008 diary
click here for 2009 diary
click here for 2010 diary
click here for 2011 diary
click here for 2012 diary
click here for 2013 diary
back to current What's New?
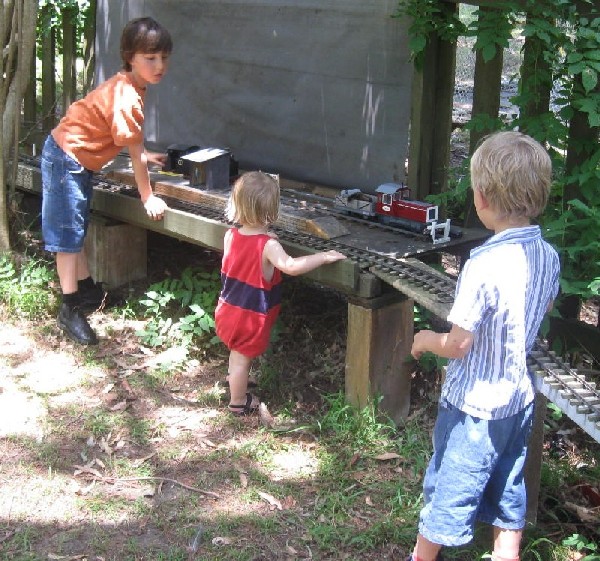
My 3 grandsons and 2 neighbour boys who got G scale 'christmas tree' sets, came to play with THEIR trains. A very busy time was had by all.
Here my 3 boys discuss a tricky shunting problem. Ernie really loved his new loco.
Dec 19, 2010
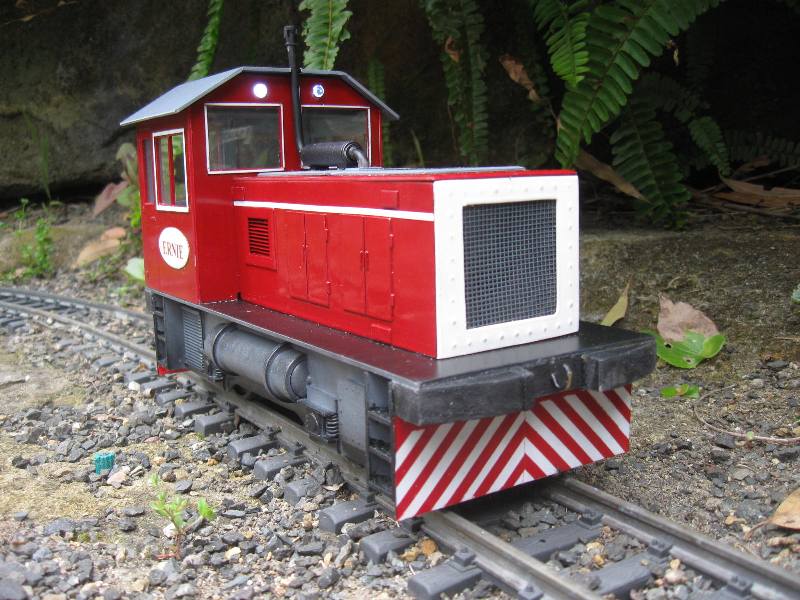
Ernie decided he didn't like his small yellow diesel and wanted a red one. So I used an Aristo long block (L'il Critter type) and copied a generic sugar cane loco. Unlike all the other grandkids' locos this one is RC. It has loud Picaxe type diesel sound.
Now all the grandkids have their own loco. (the only girl gets a steamer!) 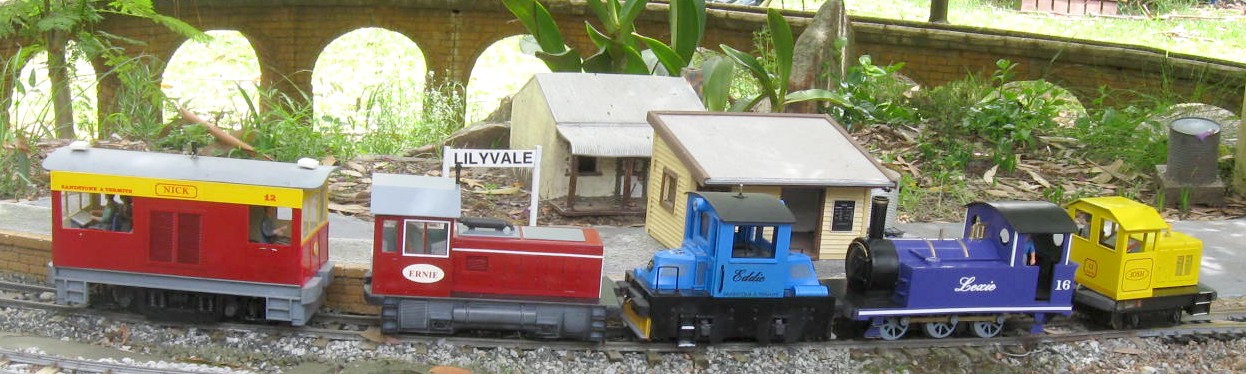


Oct 26, 2010
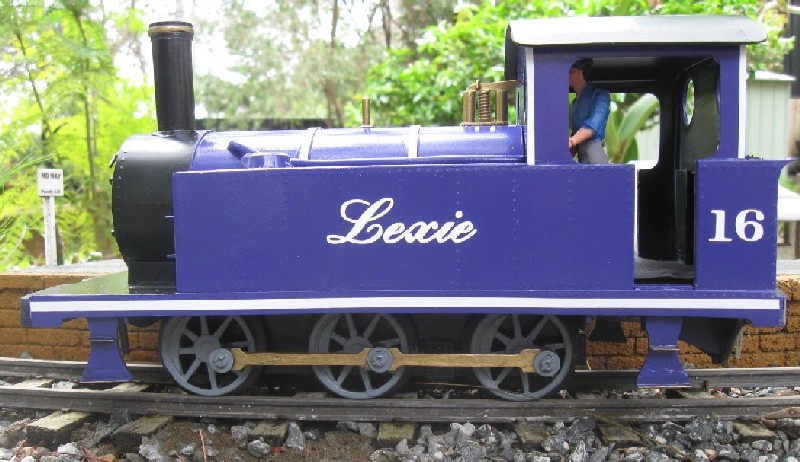
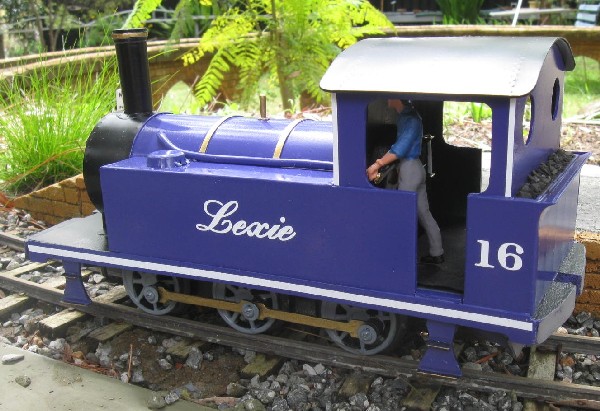
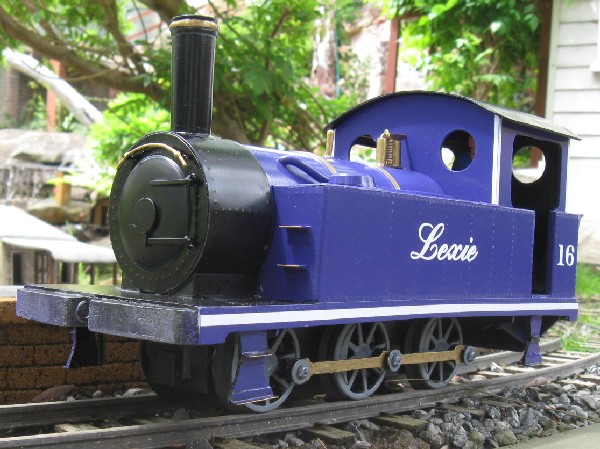
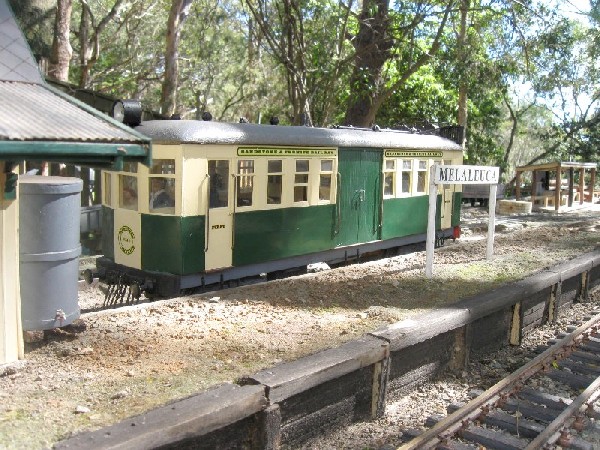
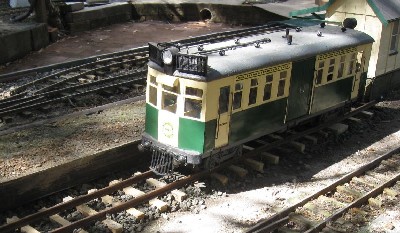
The lettering has arrived and she's in service.
click here for a short video.
Sept 29, 2010
We had a visit from John Squire from Toledo, Ohio. The weather was not too hot and a great time was had by all including his 2 grandsons.
Sept 25, 2010
A fantastic Spring runday with all GRASS members present.
click here for pictures and video on the GRASS site
Sept 20, 2010
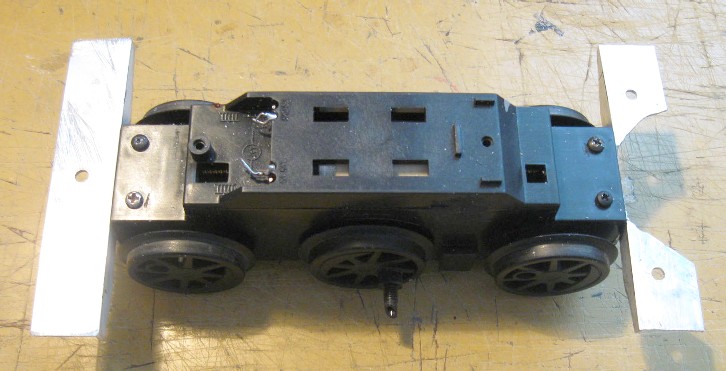
I have finally made a decision on what to make from the Piko 0-6-0 motor block (see Sept 6). It's going to be a small 0-6-0 tank. Will have RC and sound with 4 NiMH cells in each tank. Will look like this: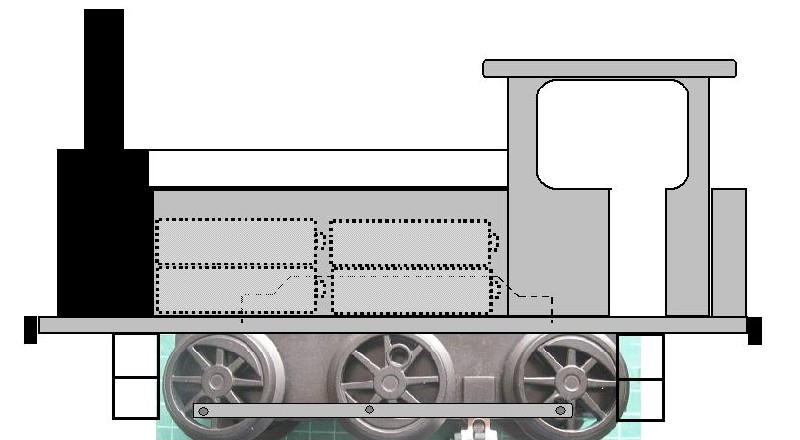
All the electronics will be in the body with just a 2 pin plug to the motor.
First off I glued some Al angle across the block ends to support the body.
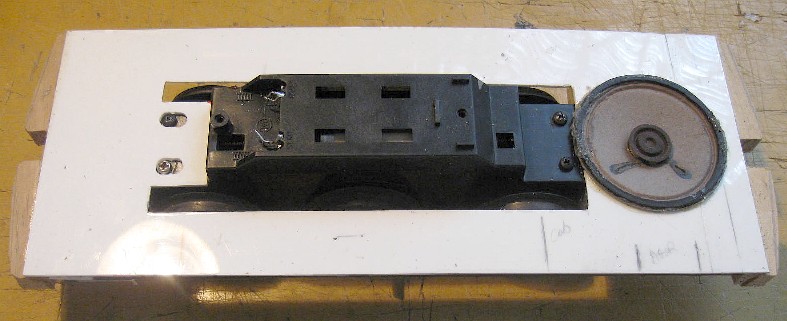
The body baseplate came next - 2 thicknesses of 1.5mm styrene. The only place I can fit a speaker in is in the floor of the cab.
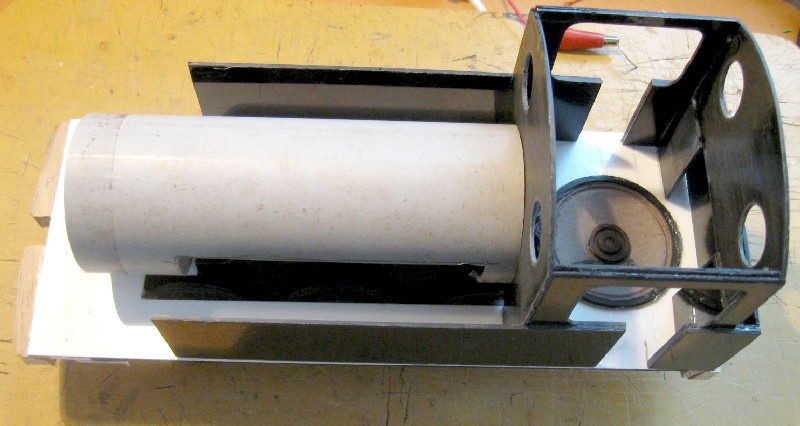
Then the sides and a boiler and it's almost looking like a loco.
Sept 16, 2010
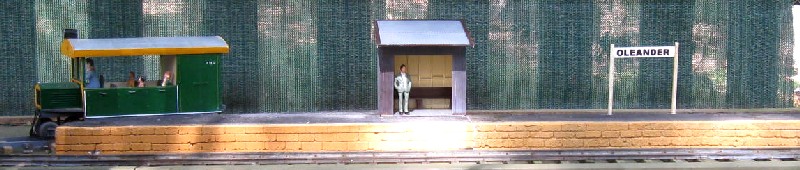
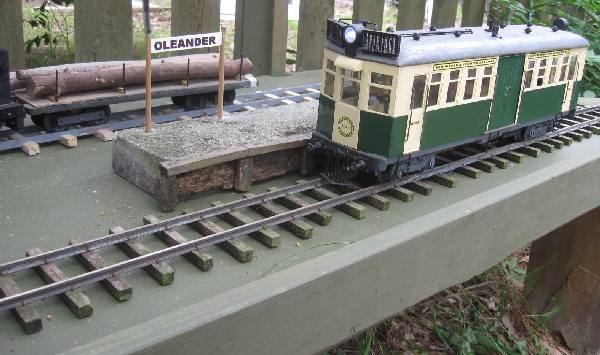
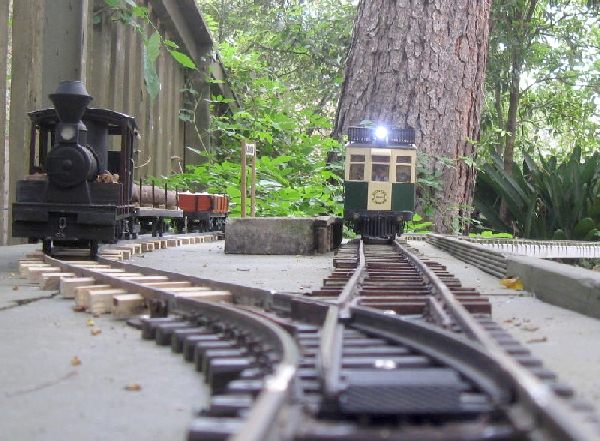
Today was a day when many projects finally got finished. The sawmill was finished but I still don't know where to put it. Originally I planned on putting it at Oleander as below. But it's squashed in against the ugly fence.
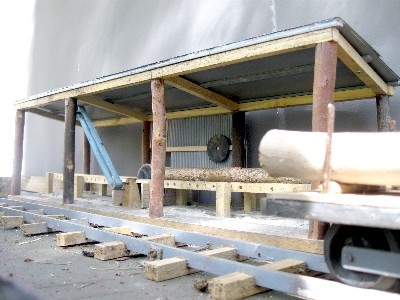
You can see another project - the grey material hung on the fence to hide it. I bought a 'mile' of it at Reverse Garbage.
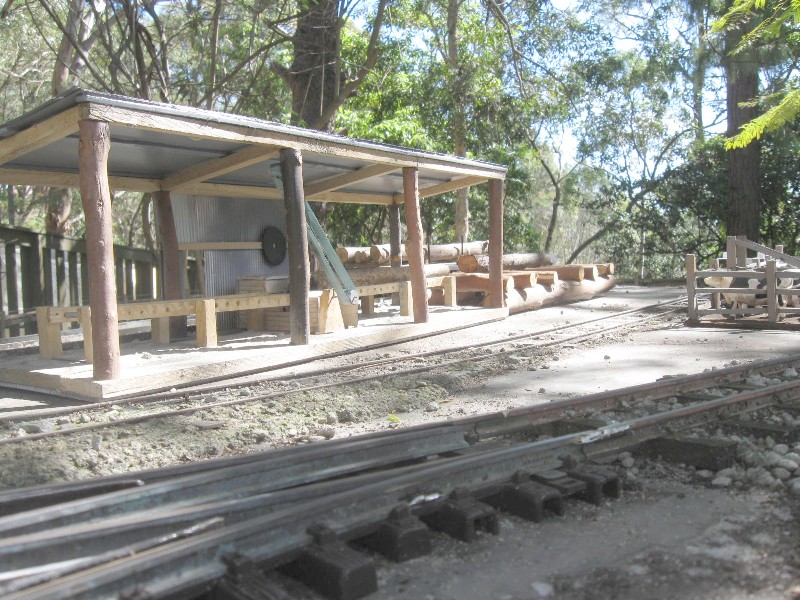
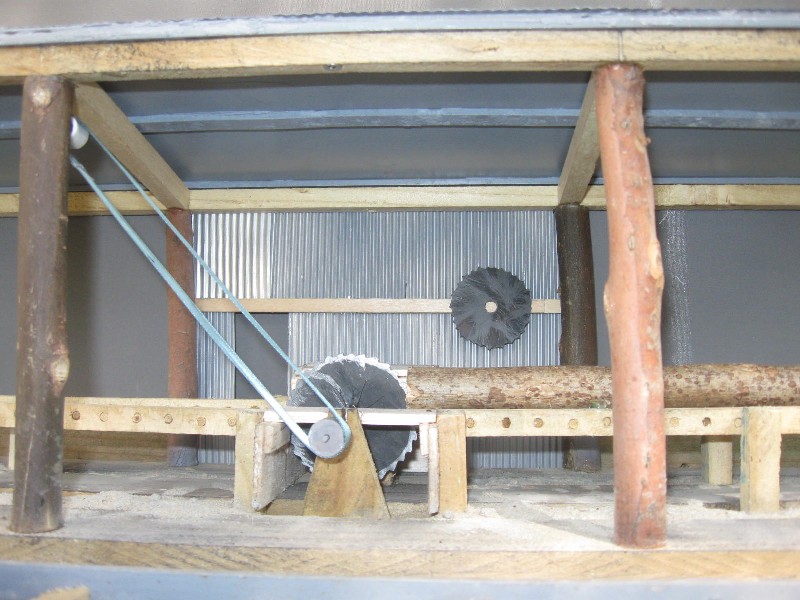
Another reason for putting it at Melaleuca is that I have power and an amplifier there (for the cow sounds) that I can use for the sawmill sounds. The saw blade does turn and the drive belt operates, if I get round to wiring it all up.
So the goods shed may go to Oleander.
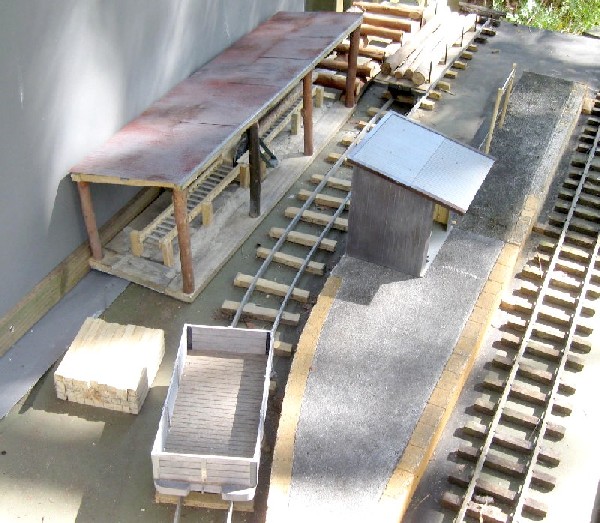
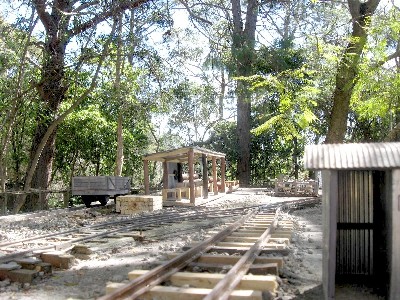
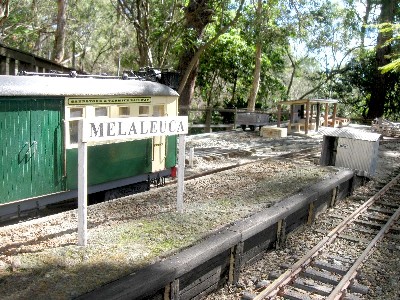
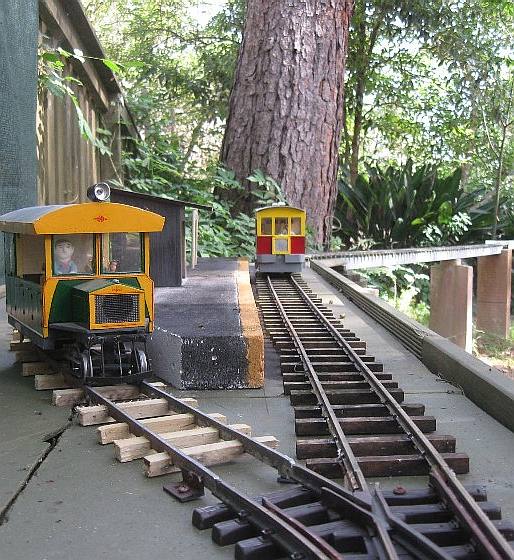
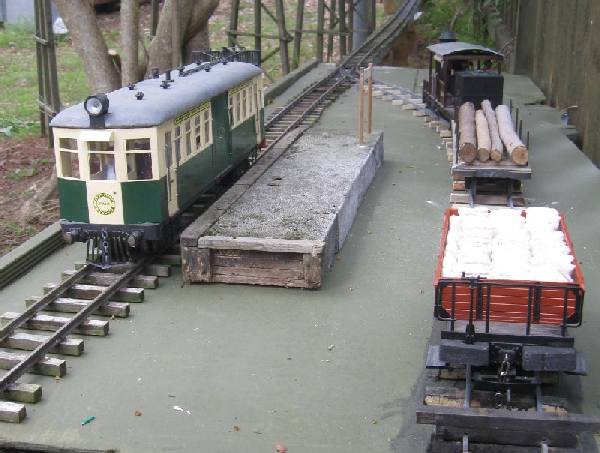
Project number 3 completed was the new railmotor dock siding at Melaleuca. I finished off the platform face and platform surface and ballasted the siding. The new siding means that's the Men's toilet has had to move off the platform.
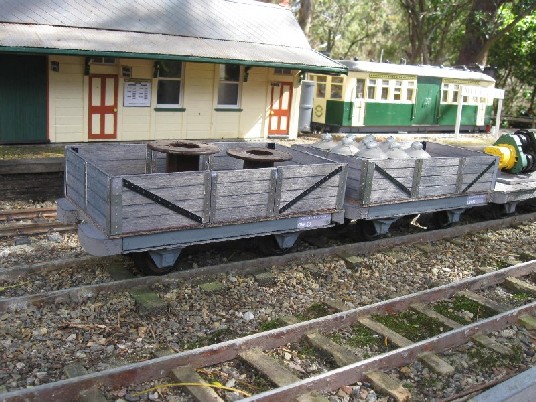
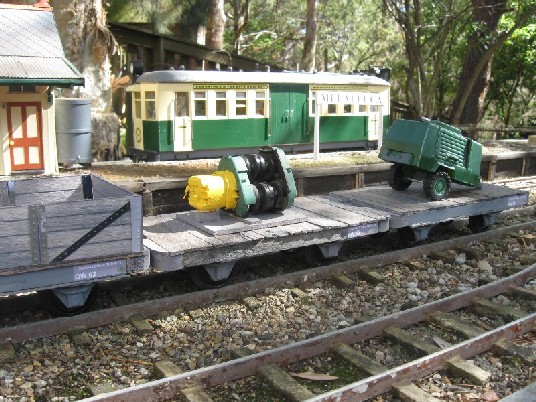
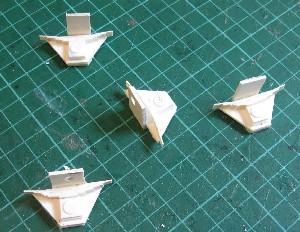
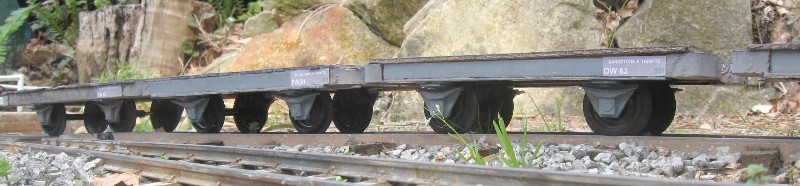
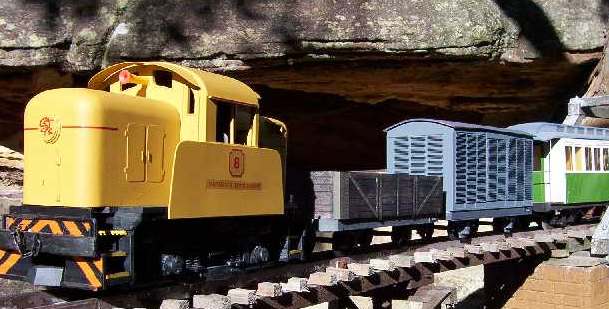
Project 4 completed was the four, 4-wheel wagons. Here they are with some loads.
Sept 13, 2010
Mark Hobbs was kind enough to donate an old LGB 'right angle' set of points, so that I could install a dock siding at Melaleuca. I straightened the curved bit beyond the frog and it was a perfect fit to lead into the siding.
Here it is cut in and the new siding made from plastic rail nailed to wood sleepers. It's 1.5m long. I've cut back the platform with the angle grinder amid so much dust that my neighbour gave me a dust mask. Now to 'face' it with something simple as it's not normally seen.
Sept 12, 2010
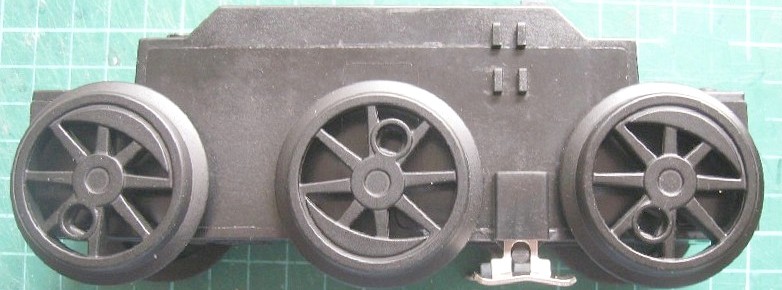
Have been working on four, 4-wheel wagons for a couple of weeks. (Cut / made enough bits for 5.) Finally nearly finished. Two will be flat wagons and 2 will have wooden sides.
+++++++++++++++++++++++++++++++++++++++++++++++++++++++++++++++++++++++++
Also completed an infra red controller for Keith's points. He has double tracked part of his layout, but where it goes back to single track, he wanted a method of having the points normally set for the correct approach direction from the single track, but when a train arrives on the double track, the points automatically change. Very similar to my reverse loop points controller.
Sept 6, 2010
Visited Pamak hobby shop with some mates. I wasn't there to buy anything, but this PIKO 0-6-0 motor block took my fancy for $110. I'm not too impressed with it once I got it home. As usual I start off by doing some bench electrical tests. Takes 400 mA with its wheels in the air - ie the motor losses. That's over twice Aristo blocks.
Then I tried holding the wheels to get the stalled current, but I could hear the gears slipping. I noticed that 2 screws were missing from the top plate, so I assume the looseness is a problem. I took the plate off and added a bit of cardboard to provide more force onto the motor and put in 4 screws.
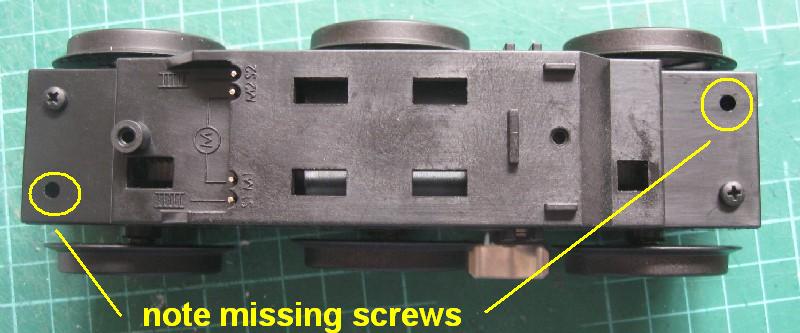
At least it's easy to pull apart. I took the wheel pickups and skates off. The two outer axles are driven, and the centre axle wheels are flanged but have about 5mm side play. Connecting rods not supplied and I'm not sure how I'll allow for the side play.
Now what to build ?? Either a small 0-6-0 tank with manual control (for my granddaughter) OR a 2-6-0 with RC etc ?
Aug 31, 2010
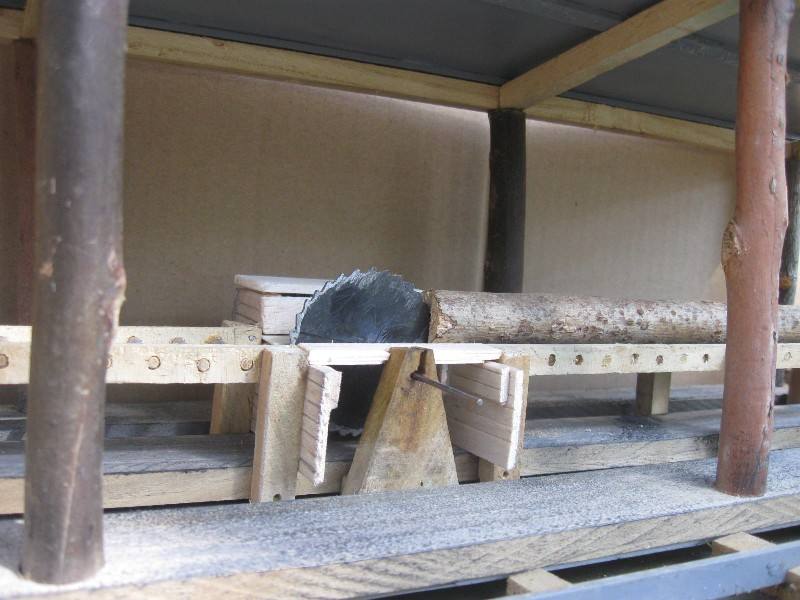
I've started building a small sawmill. It will probably go at Oleander siding (along the fence). So can only be 150mm wide, but 1.8m long. I raided my barbecue wood pile for some timber and made most of the shed and log stage from bits of gum tree. The roof is corrugated plastic sheet.
Here's the progress so far. Logs get offloaded from the train at right end to a rough log 'stage'. Then into the mill on rollers. The saw will turn - there's an electric motor behind the blade. Hopefully it will also drive a (dummy) shaft and steam piston and flywheel. It will have sound. But that's later. At the left end the sawn timber will be loaded back onto rail. This bit not started yet.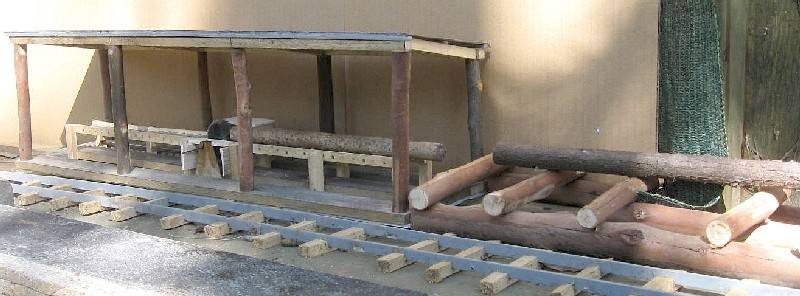

Aug 22, 2010
I've now installed 2.4 GHz radio control in the 19 class. (It was a cheap model car type controller). I reused the Bachmann sound card, added an amplifier and a whistle.
Aug 18, 2010
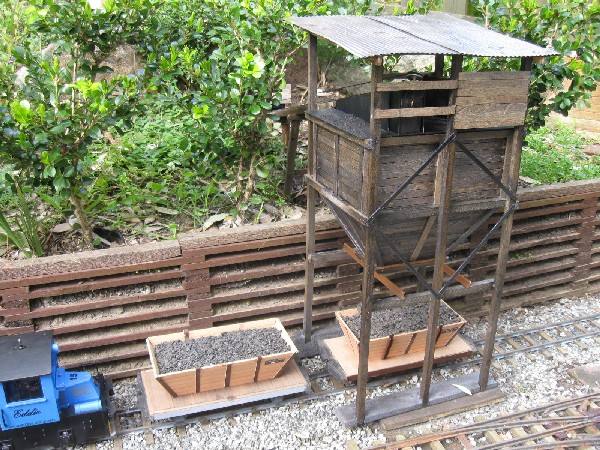
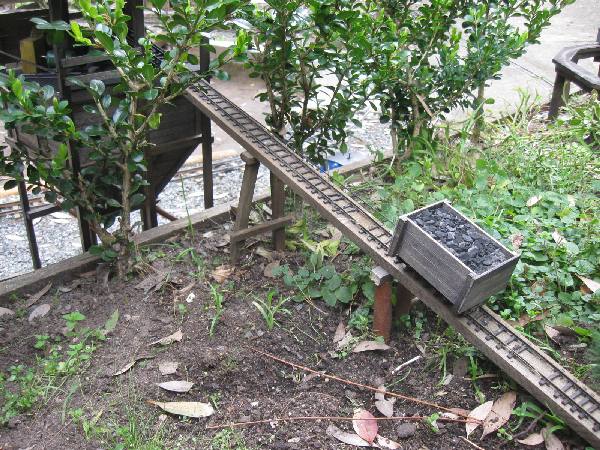
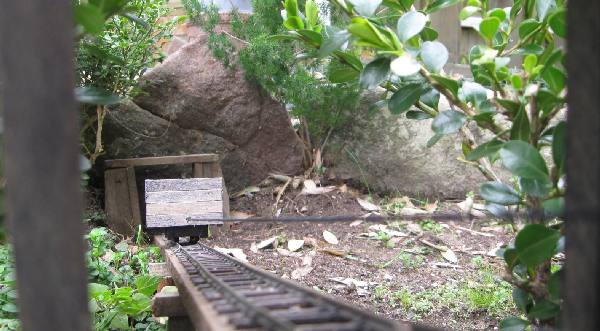
The coal loader is all finished, with a HO track feeding from a mine entrance, and a small coal skip (static).

Aug 15, 2010
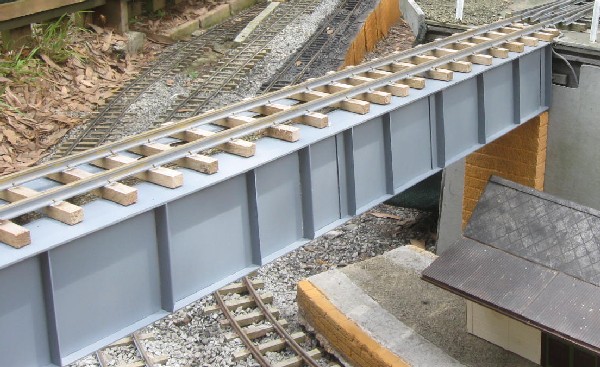
I've updated my Bridges photo gallery with new pics.
click here
Aug 12, 2010
The Service station is finally finished too. Here's some location pics at Lilyvale.
Comparison of model and prototype
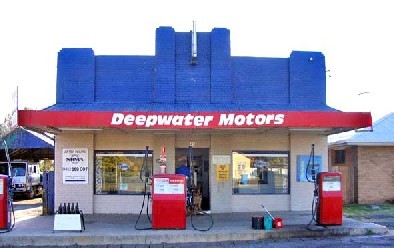

Signs were down by my usual method of printing the mirror image on clear plastic and glueing on. Petrol bowsers were done the same way with an image off the net.
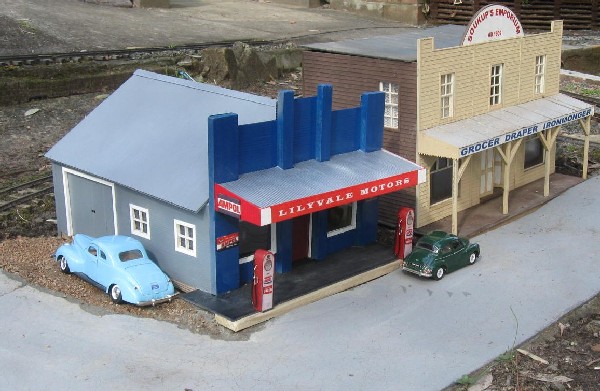
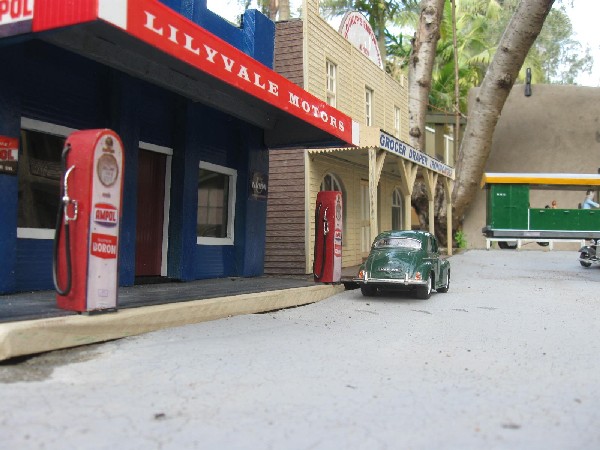
A view down the street.
Aug 2, 2010
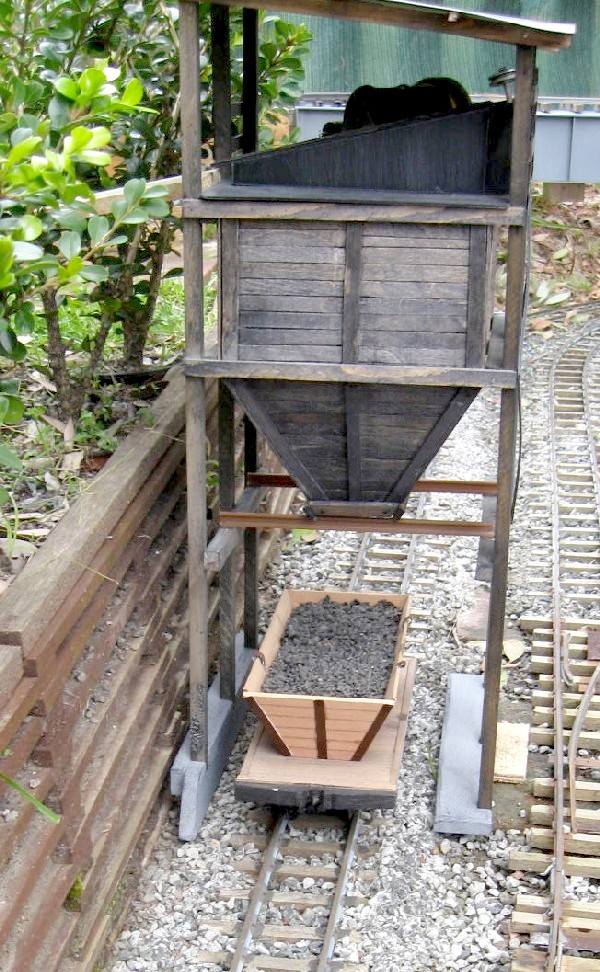
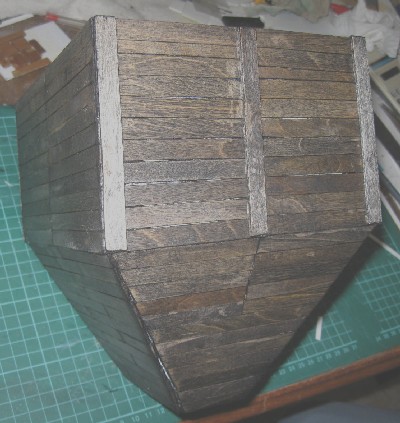
Work continues on the gravel/coal loader. All paddle pop sticks glued on and weathered using black shoe polish. I'll paint with clear satin varnish to finish. Not every railway can say they polish their coal bins!!
++++++++++++++++++++++++++++++++++++++++++++++++++++++++++++
Also started work on an old 'service station' for Lilyvale village. Made from corrugated plastic with lots of wood reinforcing.
Based on this building on the left. Roughed out on the right.
July 31, 2010
A busy run day with some visitors from Bomaderry. See GRASS website pages
July 28, 2010
Updated my pages on Battery Charging here
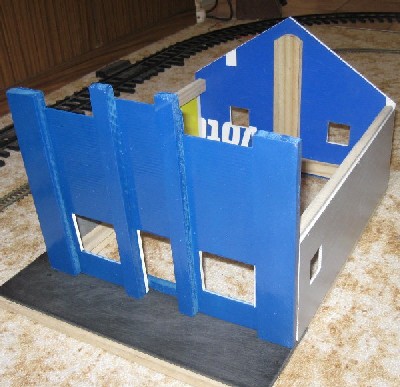
A rainy day so I started building a gravel/coal loader to go over the track at Maple Jn. The feeder at the top MAY be a small cable hauled hopper on HO track. It's about 200mm long, 180 wide and 500mm high. Here's what it will look like:
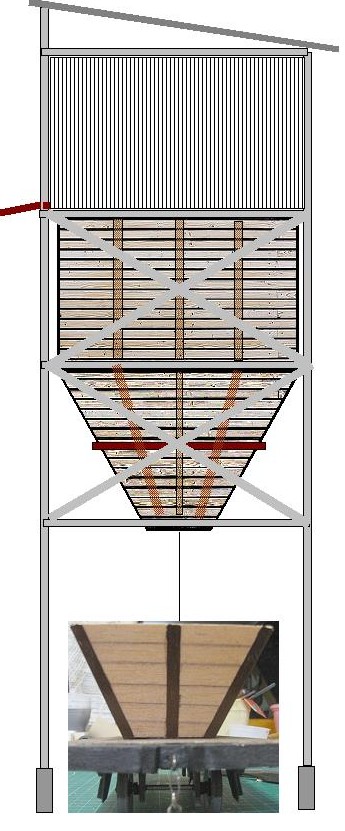
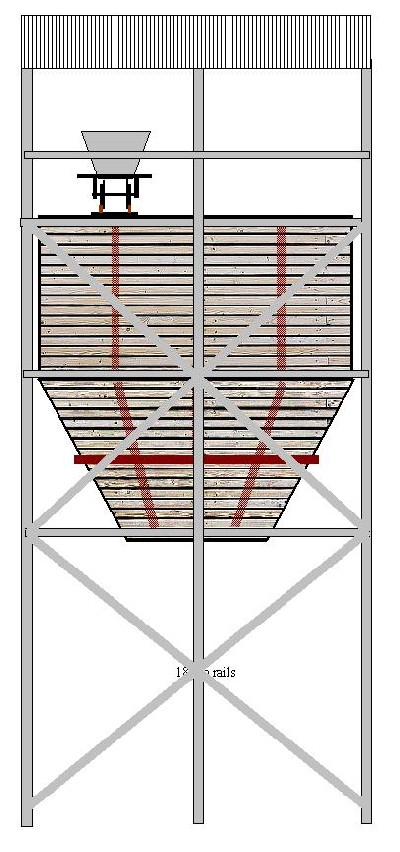
I cut the hopper from corrugated plastic sign material, folded it and held with masking tape. Then I'll cover it with paddle pop sticks glued on with Fuller's Ultra Clear. The main framing will be timber strips.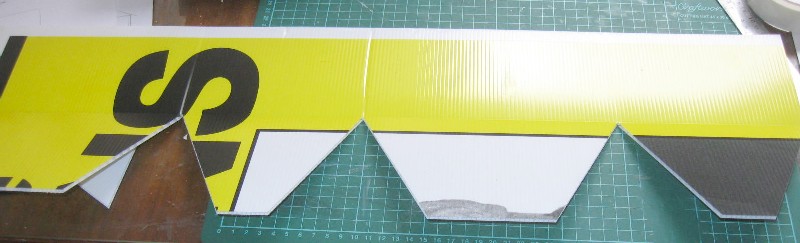
July 27, 2010
Today I experimented with printing bricks onto paper to cover a building. I used MS Photoeditor which has a brick effects option. I printed A4 size on glossy photo paper and will stick to whatever building I'm making.

I use MS Photo Editor. It was an inclusion in older (pre XP) MS versions, but you can download it :
here
Open PhotoEd
File|New
Select width 28cm, height 18cm for filling an A4 page.
Select Color and choose a colour for your bricks. OK OK
Select Effects|Texturiser and choose bricks from dropdown menu
Select Scaling of about 110% and Relief about 15-20%
Light Source top right and Apply.
There you have it. You can play with brightness and contrast under Image|Balance
To print it you need to rotate it - select Image|Rotate right
File|print| and you’re away.
July 22, 2010
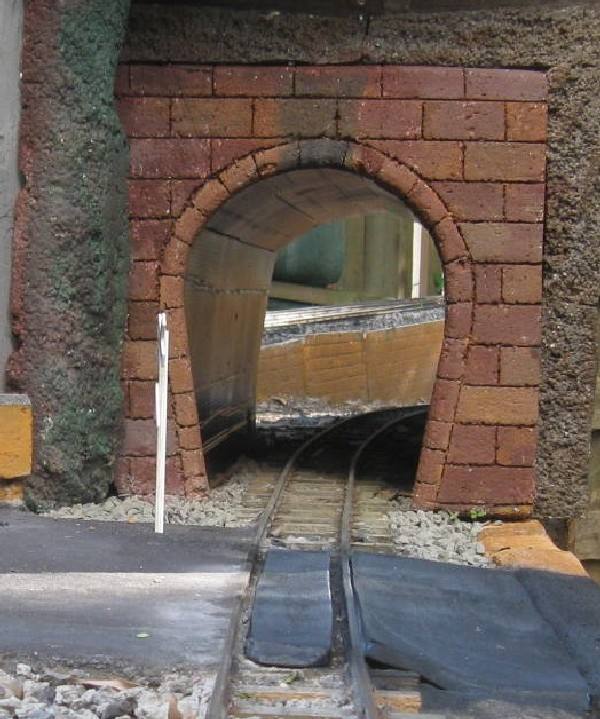
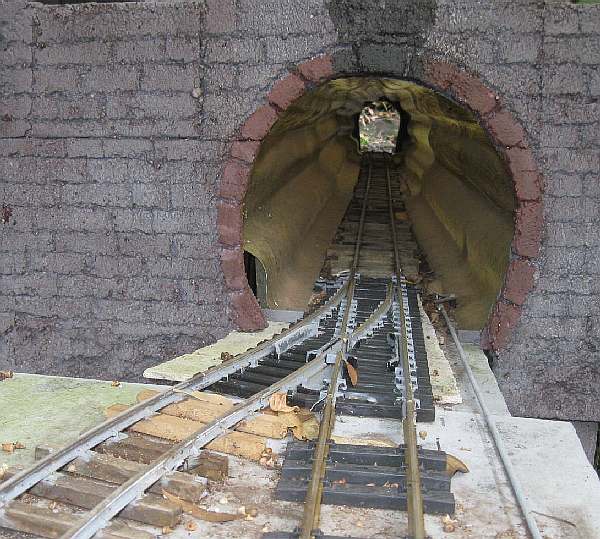 A new tunnel mouth for the corrugated tunnel at Blackwall. (Actually the 'tunnel' is curved corrugated sheeting used to keep leaves off the track behind the garden shed.)
It's made from polystyrene foam glued to some scrap timber.
July 7, 2010
We've finally returned from our Europe/USA trip. But it's too cold to go outside and clean the track yet! I splurged on some vinyl lettering from G Scale Graphics for a couple of locos. It's a bit expensive ($80 for 3 locos), but is easy to apply and looks good. (must get some more of that medication to stop these spending urges!)
And another Aristo motor block - that makes 3 sitting in the cupboard waiting for me to get to work.
Even though it had only been bent in the case for 30 hrs or so, it came out in a parabola shape. Needed a bit of rebending to straighten it out. But it's OK now. No firm plans on what to use it for yet, but some bridges will definately get check rails from it.
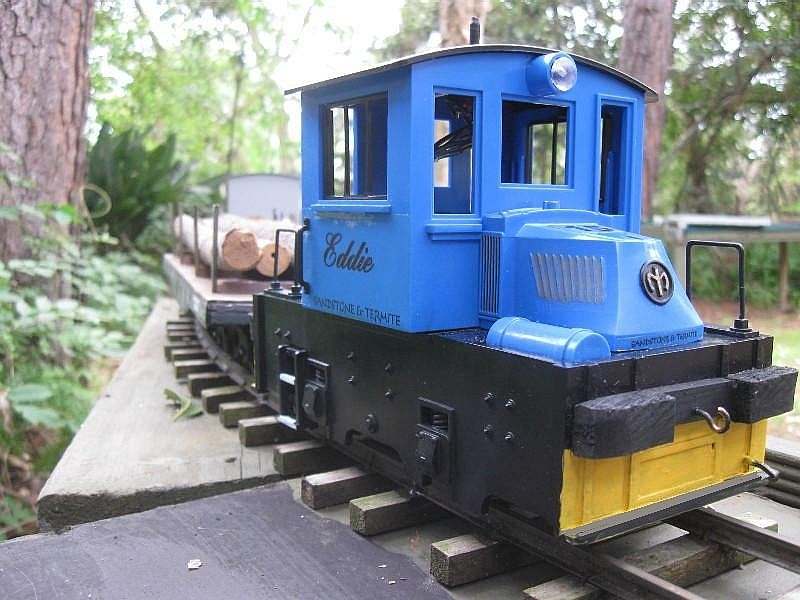
April 27, 2010
I converted the Hartland "Mack" loco to battery power. It has 5 NiMH cells under the 'skirt' and a forward/stop/reverse switch on the cab roof. It potters along at around 20 kph. Added a few details and named it for grandson #3, Eddie. here's a short video
April 24, 2010
A bit more work on Oleander station. It has proved to be a very useful siding for crossing short trains, and for terminating railmotors. So I decided to have a short(er) platform on the siding as well.
April 14, 2010
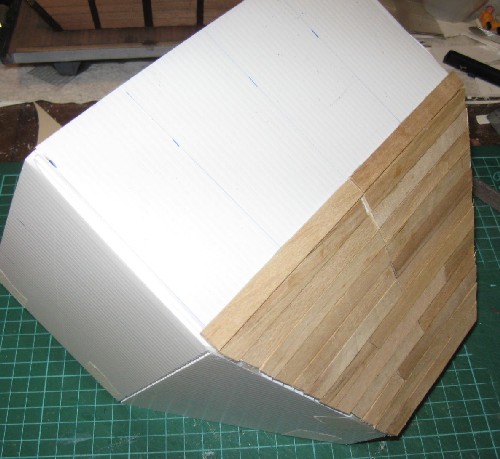
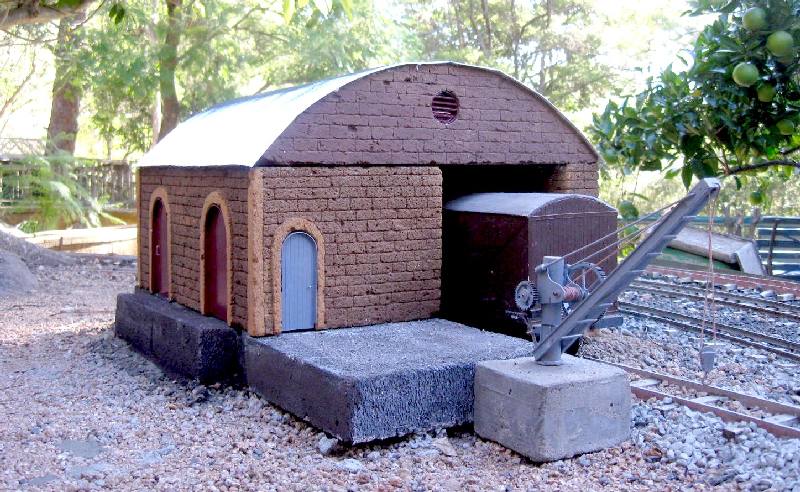
I've completed a goods shed made from 4 Hebel blocks.
March 14, 2010
I have fitted 2.4 GHz RC to my old red Garratt.
Here's a link to a short video of it running today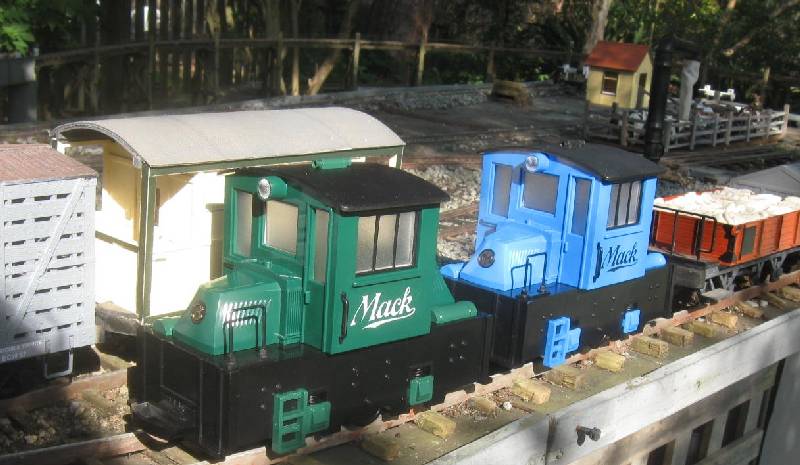
March 14, 2010
GRASS had a good run day here on 13/3 - see the website.
March 12, 2010
 I've finished the baseboard for the new Oleander station (midway between Lilyvale and Ti-tree).
The board is only 2.6m long and 0.6m wide. It has a short platform (will be about 4').
 I had an old 2' radius turnout, so I put in a siding using old aluminium bar rail. Maybe there will be a mine or something there later.
March 10, 2010
Some new pictures of live steam day At Keith Lindsey's place on the GRASS website. Includes a video.
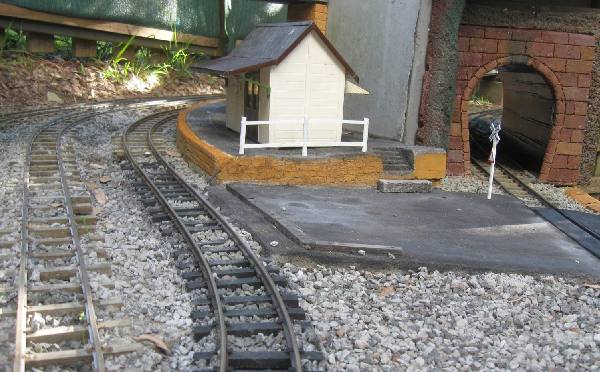
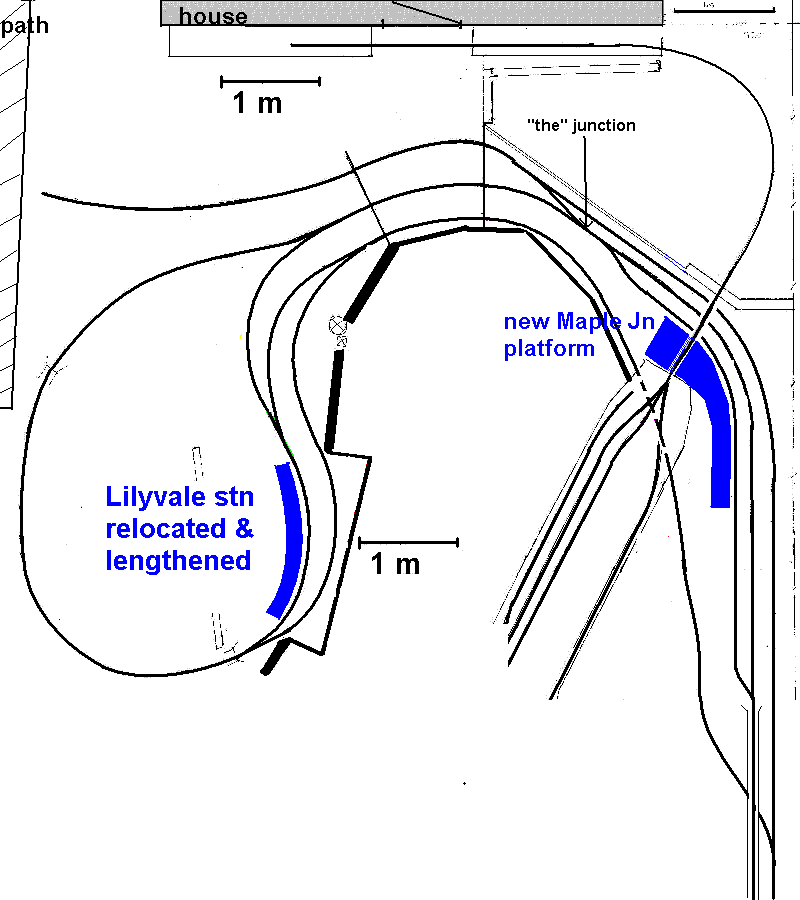
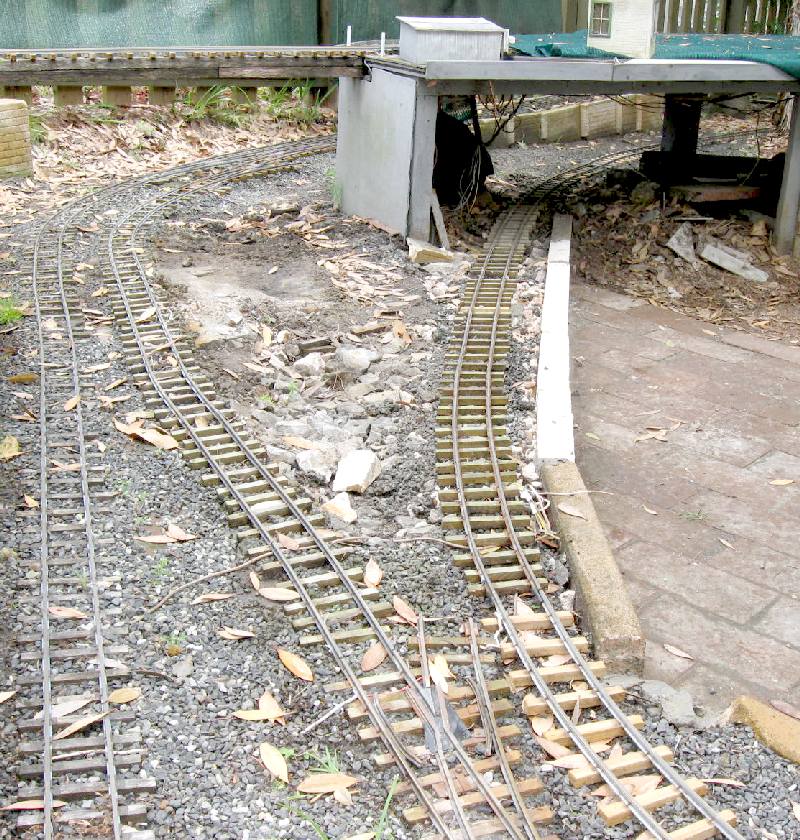
 All the new trackwork around Lilyvale and Maple Jn is finally finished
 The parking area is a 'stepping' place for me to step across the tracks to the garden.
 Here's the new tunnel under Melaleuca complete too.
March 5, 2010
I've finally laid the rubber road at Lilyvale. The pub now occupies the corner position it was designed for.
Now to get Pauline motivated into making me some more clay buildings, and to get some plants in.
 I'll have to build a goods shed and maybe a service station.
.
February 20, 2010
This old trestle bridge at Melaleuca had to go to make way for the extra track and station underneath. (there used to be a trestle right where the wagon is.) It was just a couple of pieces of tomato stake and had been there since 1995.
 So I built some side girders from sheet styrene and some 12mm plastic angle from the hardware store. It's 1m long and 100mm deep and just hangs on the tomato stakes which still provide all the strength. Total cost about $10 including the can of spray paint.
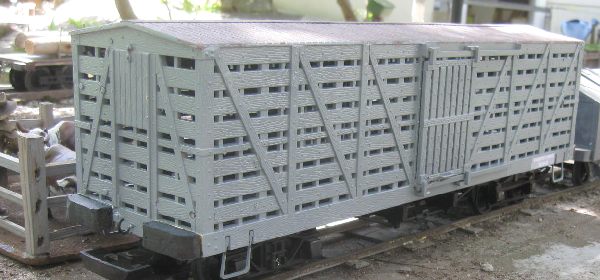
February 19, 2010
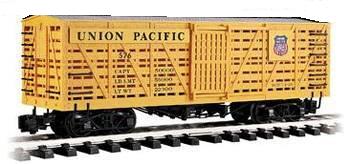
Bryan Coppock gave me a yellow (yuk!) Bachmann, Union Pacific cattle car. To make it more Australian, I removed the roof catwalk and all the ladders (and filled all the holes), removed the signs. I covered the holes in the roof with styrene strips and gave it a paint with grey primer.
And now it looks like this...
February 16, 2010
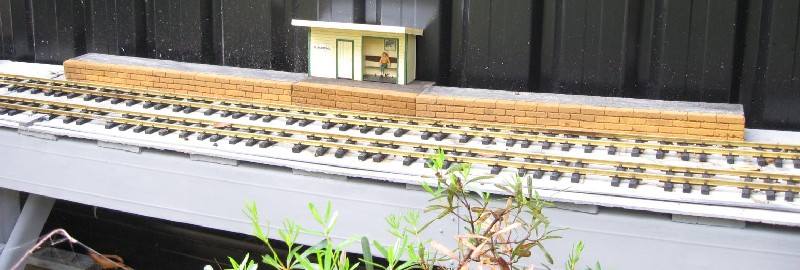
The new Hebel platform at Lilyvale has been cemented in place. It needs a fence. Maybe a picket type? I just hope it has enough clearance for wide visiting locos.
The blue 'rubber road' (camping mattress) will also be laid on a very wet slurry of concrete.
February 12, 2010
I added radio control to my old yellow diesel (L'il Critter converted to NSW X200 class).
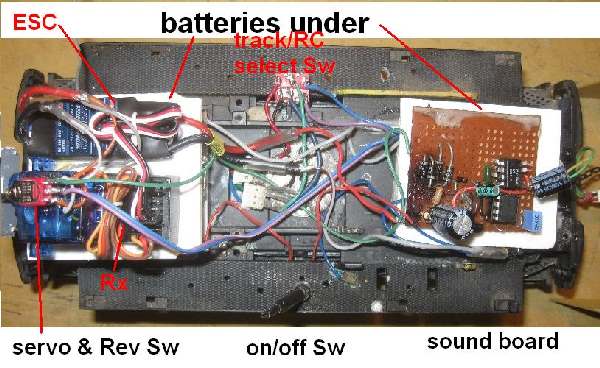 It was a bit of a squeeze. Has 4 cells in each end. One end has all the RC stuff and the other, the sound board.
I added a changeover switch so it can still run from track power, as my test loco.
February 11, 2010
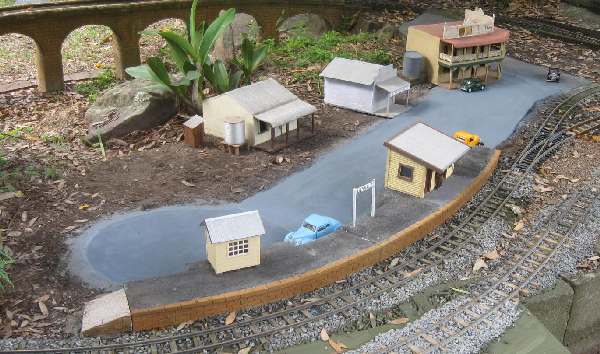
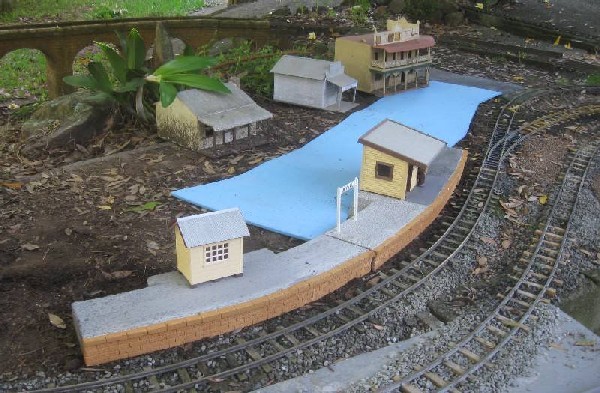
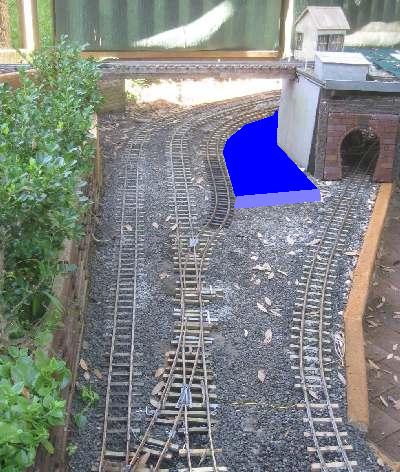
I've changed my mind (again) about the layout at Maple Jn. Originally I had allowed for an island platform, but I decided I didn't like the look of the track, so now I've relaid the track with 2 parallel lines and will have a single platform - shown blue.
Most ballasting has been done.
February 8, 2010
For my next 2.4 GHz project, I’ve used one lot of equipment to do an RC track power control.
I run almost all battery power locos now, but I still have four, 433 MHz track controllers, but only use them for visitors. I selected the least reliable of the 4 for conversion.
As the existing controller had a 30V supply, I couldn’t use a stock ESC rated at 15V, so I built my own using a Picaxe microcontroller.
The old track controller was an inertia type with Darlington transistor, ‘pure’ dc output. It was an easy conversion as I could reuse the main power transistor part of the old controller. I just had to decode the ‘servo’ pulses from the Rx throttle channel and convert them to a PWM voltage signal and feed it to the inertia capacitor. The Picaxe 08M does this easily.
+++++++++++++++++++++++++++++++++++++++++++++++++++++++++++++++++++++
As part of the work, I also converted the Transmitter, so it has TWO throttles. This is a simple operation. Now I can independently control the track power with the left stick and a battery loco with the right stick!
For full details see my webpage here
February 4, 2010
Well my latest purchase of $A300 worth of 2.4 GHz radio control stuff from HobbyKing has arrived in good order.
I’ve now got 3 transmitters and enough receivers and motor controllers and servos to do 8 locos (4 of which don’t exist yet, but you have to plan ahead).
The purchase also included 48, NiMH AA, 2300mAh cells – at about $A1.05 each delivered. That should be enough for 5 or 6 locos.
So with the money previously spent, I’ll now get 8 locos radio controlled for under $A500 including batteries!
January 2, 2010
I cut up and scribed some 50mm thick Hebel to make a longer platform for Blackwall station (see Nov 28 entry). As always, the colours are cement oxides (black and sandstone colours). Needs a fence and nameboards to finish it off.
 Also, some progress on the new Hebel retaining wall across the old Maple Jn site. The new track is made but more fill is needed. The new grade is 1:45 compared to the old 1:30 on a 900mm radius curve.
January 2, 2010
While browsing the $2 shop I noticed these plastic 'aquarium ferns'.